The trick to dollar store Halloween decorations is one move: take a plain, unfinished base item and give it a real finish. Paint, print, or wrap it, then the cheap piece reads as something you meant to do on purpose. Below are six beginner-friendly projects, each one built from a single dollar store base plus paint, paper, and fabric you probably already own.
Every project here works without a sewing machine and without a cutting machine. Most take 20 to 45 minutes, and the whole set of six can be finished in an afternoon if you paint in batches. I’ve built these displays year after year, and the pieces that get reused each October are the ones I spent the extra ten minutes distressing.
The one habit that separates a dollar store haul from a designer look is finishing everything in the same palette. Pick two colors plus black before you start, and hold to them across every piece.
Table of Contents
- What You Need
- Essential dollar store bases
- Finishing supplies
- Optional but worth grabbing
- Safety items
- Step-by-Step
- 1. Make a Spooky Mason Jar Lantern
- 2. Create a Haunted-Style Wall Sign
- 3. Build a Black-and-Orange Table Runner
- 4. Make Apothecary Bottles with Spooky Labels
- 5. Turn Dollar Store Baskets into Monster Storage Bins
- 6. Assemble a Faux Cemetery Vignette
- Common Mistakes
- Using the wrong adhesive
- Moving pieces before the paint is dry
- Overcrowding a display
- Using real candles near fabric
- Putting light plastic outdoors without weights
- Forgetting to match the palette
- Frequently Asked Questions
- What are the best dollar store supplies for Halloween decorations?
- What craft paint works best on glass and plastic decorations?
- How can I make dollar store decorations look more expensive?
- Are battery-powered candles safe for indoor Halloween decorations?
- How do I make dollar store Halloween decorations last outdoors?
- Can I use regular glue and scissors for these projects?
- Conclusion
What You Need
The core supply list is short enough to finish in one trip down the aisles. Grab the base items first, then the shared finishing supplies, so you can batch your steps.
Essential dollar store bases
- Glass jars and bottles — mason-jar style jars, bud vases, and squat apothecary bottles in mixed heights. Mixed heights matter more than matching sets, because a grouped display with three different sizes looks collected instead of store-bought.
- Picture frames and small wood plaques — plain shadow box frames and unfinished wood signs from the home decor aisle.
- Table runners — a plain woven or burlap-look runner, or a roll of burlap you can cut to length.
- Plastic storage baskets — handled totes in a neutral color, not the bright seasonal print.
- Foam pumpkins, plastic skeletons, foam board — for the cemetery vignette and for supporting signs on the ground.
- Faux greenery — black or deep green stems and garland from the floral aisle.
Finishing supplies
- Matte black acrylic craft paint and one warm accent, usually burnt orange, deep plum, or moss green
- Black spray paint and, if you want a metallic note, one copper or gold spray can
- Mod podge or any decoupage glue, plus a foam brush for an even coat
- Cardstock and plain printer paper for signs and labels
- Creepy cloth or black tulle, sandpaper, and a pair of scissors
- Hot glue gun and double-sided tape
Optional but worth grabbing
- Battery-operated LED tea lights and taper candles — the single best swap for a real flame
- Faux fur scraps, large googly eyes, and black chenille stems
- A stencil or free printable lettering template, and a small detail brush
- Canning jars with lids, which become easy hangers for anything you want to suspend
Safety items
- A dust mask and a window fan for any spray painting, done outdoors or in a well-ventilated room
- Craft weights or pebbles for anything sitting outside, since plastic decor catches wind
- Fishing line plus removable Command hooks for hanging lightweight pieces without nails
- LED candles instead of flame, especially near gauze, tulle, and painted paper
Step-by-Step
Work in this order and you’ll finish with a coordinated display: paint every base first, let it cure while you cut paper, then assemble the small pieces last. Six projects follow, starting with the one that teaches the technique the rest reuse.
1. Make a Spooky Mason Jar Lantern
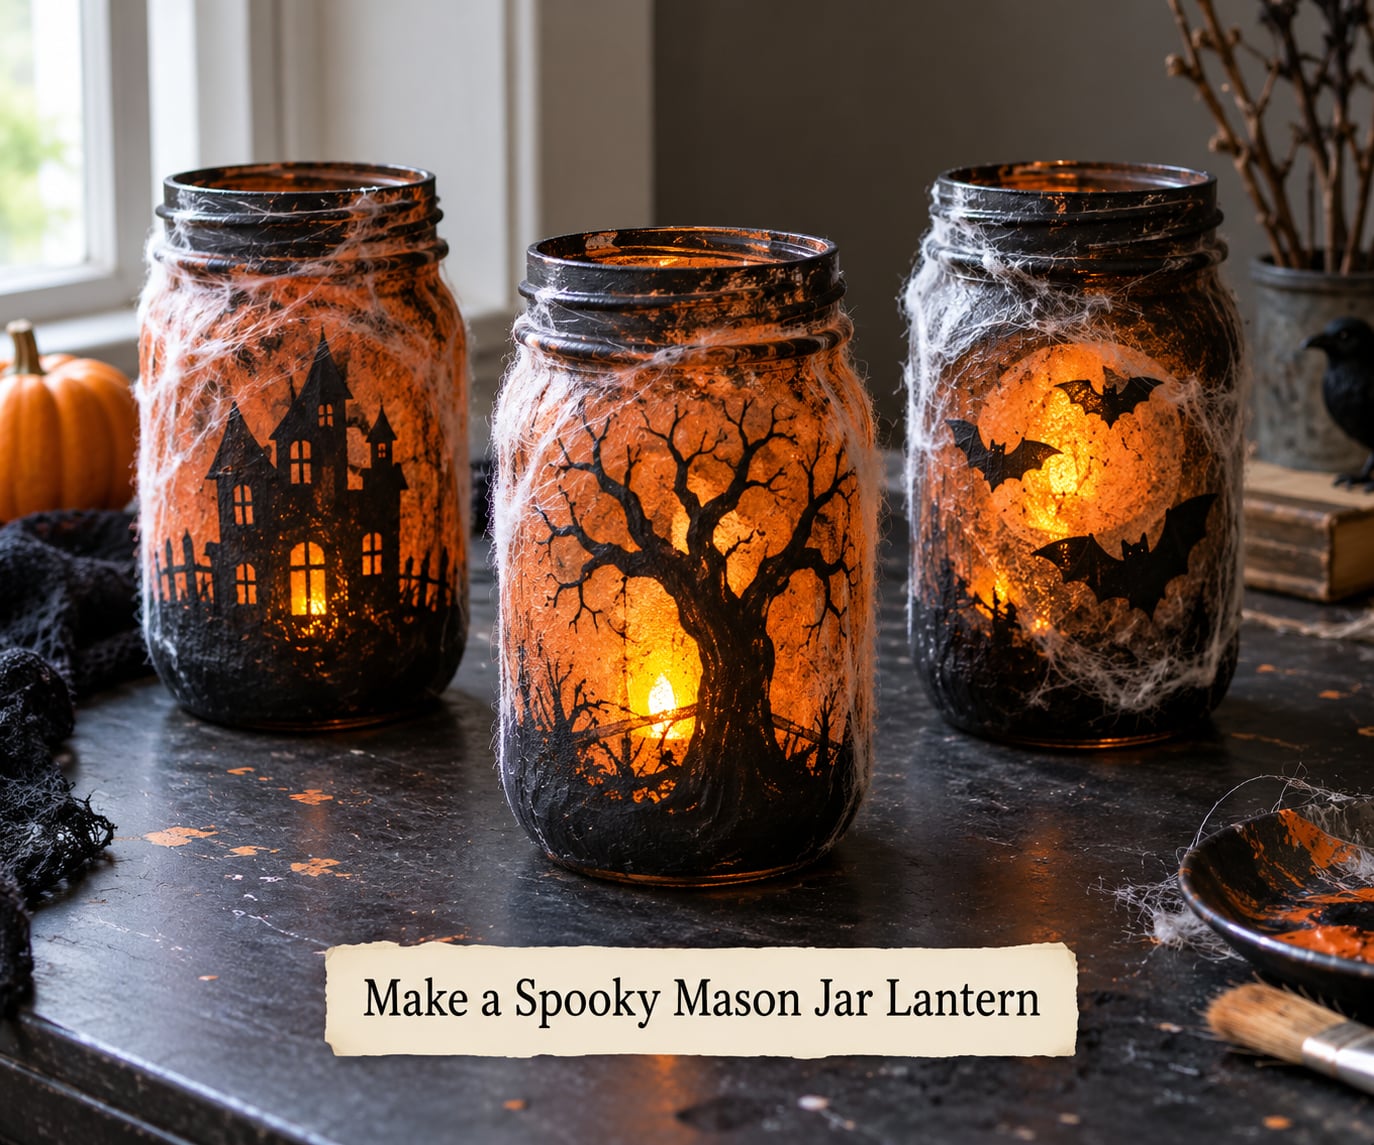
This is the project that teaches the whole method: paint a cheap base, distress it, add texture, light it. Use jars in three heights for a grouped effect on a porch step or a dining table.
- Clean and de-oil the glass. Wipe each jar with rubbing alcohol and let it dry fully. Paint will slide off oily glass, and that is the most common reason a first attempt peels.
- Paint the lower two-thirds in matte black. Use a foam brush and thin coats. Thin coats dry faster and stay smooth; thick coats bead and crack as they dry.
- Add the accent color while the black is still slightly damp. Dip a sponge or the end of a paper towel into the accent color and stipple it over the black so it looks weathered rather than clean.
- Distress it. Sand a few random areas with fine sandpaper, then dab on a little accent paint with a nearly dry brush. The unevenness is the point.
- Glue on texture. Coat the bottom band with mod podge, lay on a strip of creepy cloth or black tulle, and press it down until dry. Wrinkles read as cobwebs when the light comes through.
- Light it. Drop an LED tea light inside, switch it on, and set the jar on a dark surface.
You’ll know it worked when the bottom half disappears in low light and only the painted band and the glow read. That contrast is what makes the jar look like a designed lantern instead of a painted container. If you plan to reuse the jars for Thanksgiving, skip step five and paint the band a warm cream instead.
2. Create a Haunted-Style Wall Sign
A plain frame or wood plaque becomes the piece guests read first, usually before the front door. Keep the message short — one or two words — because a small sign with clean lettering looks intentional and a large one does not.
- Prep the base. Wipe the plaque with a damp cloth. Sand any shiny finish off a plastic frame so paint has something to grip.
- Paint the field. Two coats of matte black on a wood plaque, or one coat on a frame if you want the wood to show through for a weathered look.
- Add lettering. Print a simple word in a serif font, trace it lightly with a pencil, and fill it with white or bone-colored paint and a detail brush. A stencil gives a cleaner edge; a free printable traced by hand gives a deliberately imperfect one.
- Distress the lettering. Once the paint is dry, drag a dry brush loaded with black across the surface so the letters look worn.
- Finish and hang. Seal with a light coat of mod podge if you’re reusing it, or leave it matte. Hang with removable hooks rather than nails if you rent.
Test the wording by squinting at it from across the room. If you can read it while holding a drink and half your attention on a trick-or-treater, it’s the right length.
3. Build a Black-and-Orange Table Runner
This is the fastest project here and the one that pulls a room together. It suits a dining table, an entryway console, or a party table under a bowl of candy.
- Cut to size. Trim a plain runner so it hangs six to eight inches past each end of the table, or cut a burlap roll with scissors if you want a custom length.
- Seal the fabric. Brush on a thin mod podge coat and let it dry. This gives you a stable surface for paint and keeps the weave from fraying at the ends.
- Paint the stripes. Use black fabric paint or thinned acrylic, and lay down wide bands or a zigzag. Thin each coat so the fabric texture still shows through.
- Distress the edges. Sand or scrape the painted stripes lightly, then fray the ends of burlap with your fingers for a worn look.
- Layer something on top. A strip of painted pumpkin-orange lace, a few faux leaves, or a small cardstock bat pinned at the center turns a plain runner into a Halloween piece.
Wash it cool and air dry next year and the paint will crack rather than peel, which keeps the rustic look intact. Store it folded, never rolled.
4. Make Apothecary Bottles with Spooky Labels
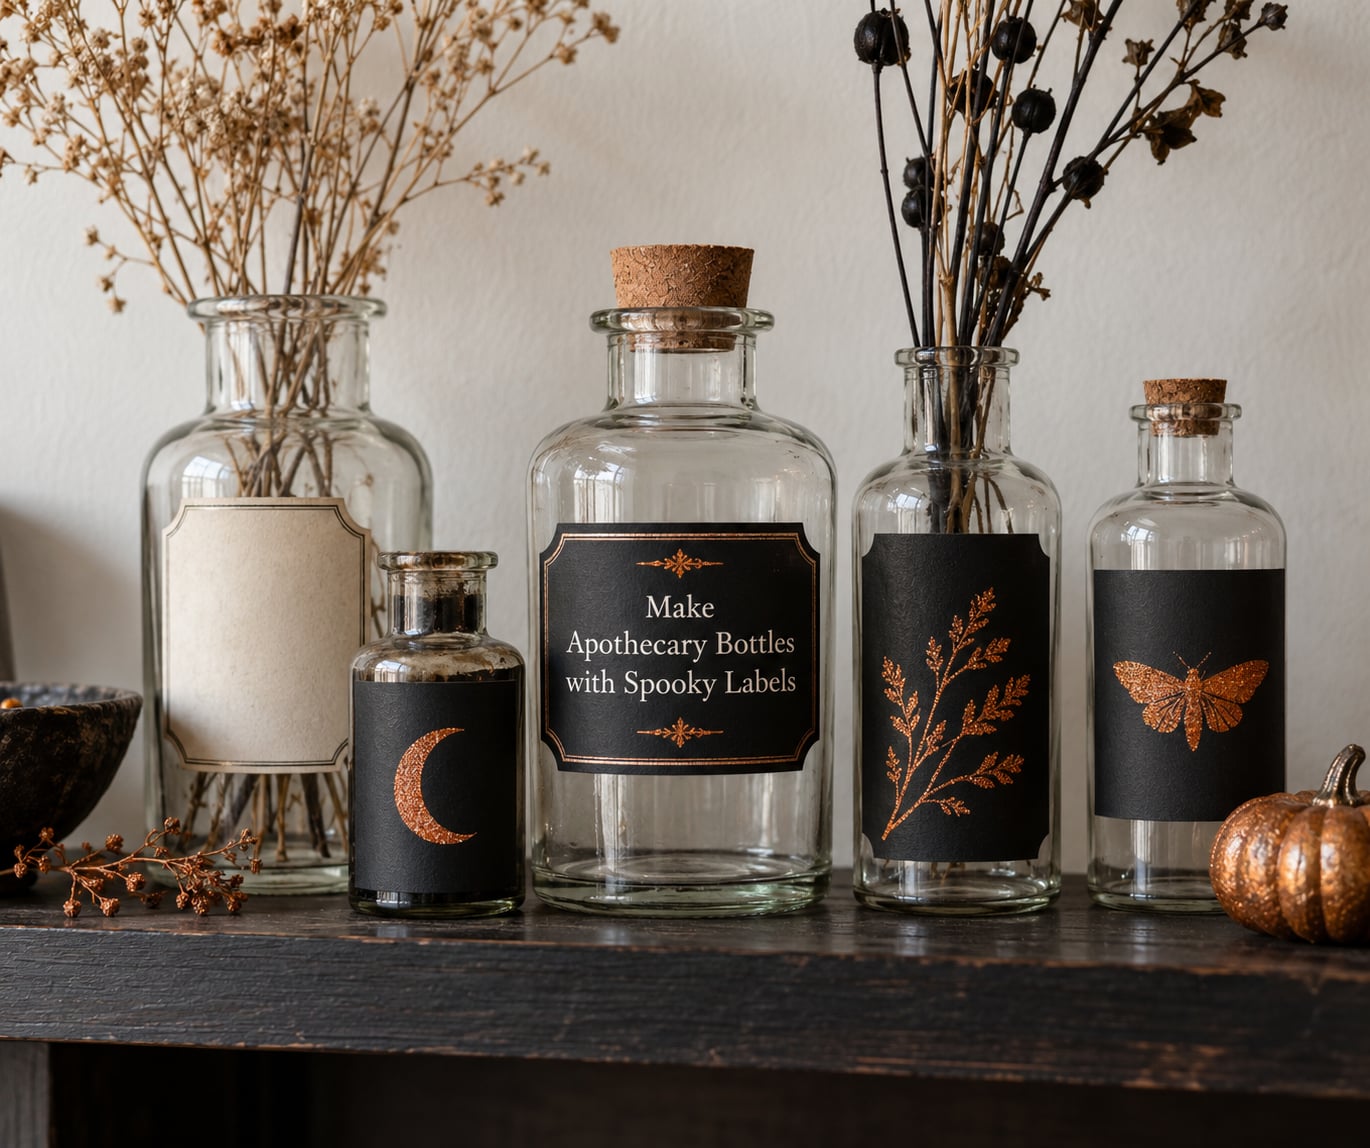
Grouped bottles are the cheapest way to make a shelf, mantle, or entryway table look styled. The trick is variety in shape and consistency in label treatment.
- Collect bottles in mismatched shapes. Bud vases, square liquor-style bottles, and round apothecary bottles read better together than a matched set.
- Clean and de-oil the glass. Alcohol wipe, then dry.
- Make the labels. Type simple names or short phrases on plain paper, print, and cut them out with a craft knife or scissors. Plain paper in black ink looks more like an old apothecary than colored cardstock.
- Apply two labels per bottle. One large on the front and a smaller one below or above it, the way old pharmacy bottles were labeled. Seal with mod podge and let it dry clear.
- Add one accent per bottle. A band of copper spray paint around the neck, a dab of orange glitter glue on the cap, or a strand of black twine tied at the neck.
- Group in odd numbers. Three, five, or seven bottles at varying heights, backed by a piece of black cardstock or a dark book.
Leave one bottle empty or fill bottles with dried stems from a florist or your yard. Nobody looks twice at the shape once the labels look right.
5. Turn Dollar Store Baskets into Monster Storage Bins
These are the pieces that earn their keep during the party and hide the clutter the rest of October. Choose neutral baskets and let the monster details carry the theme.
- Pick plain baskets. White, black, or natural woven plastic. Skip anything printed with a fall motif.
- Paint the base. Two coats of matte black or one coat of the accent color. Wipe the texture with a dry cloth afterward so the raised weave catches the light.
- Add eyes. Large googly eyes glued in a pair near the top of the front face. Three eyes on the larger basket reads better than two if you want a monster.
- Give it hair. Glue faux fur scraps to the top edge, or run three or four black chenille stems across the rim and bend them.
- Cut a mouth and teeth. A wide black cardstock arc with white triangles gives a cartoon monster. A single jagged cut reads more grown-up.
- Label it. A small cardstock tag on twine, tied through the handle hole, keeps the “candy” or “trick-or-treat supplies” label legible.
One large bin sits by the door for coats and bags, and two smaller ones go on the party table for napkins and favors. That’s three uses from three baskets.
6. Assemble a Faux Cemetery Vignette
This is the only project that belongs outdoors, and it’s the one most people skip. A small cemetery cluster on the front lawn or along a walkway does more for a Halloween display than anything hanging above it.
- Build the tombstones. Cut tombstones from foam board with a craft knife, using rounded tops and a simple cross or RIP line. Foam board won’t warp outdoors and weighs almost nothing.
- Paint them black. Spray outside or in a ventilated space, one thin coat, and let them dry fully before handling. Add gray dry-brushing to the edges afterward for depth.
- Weatherproof them. Paint the finished tombstones with a clear outdoor sealant, or set them on a small base of pebbles and push the stake end into the ground.
- Stake them. Push a wooden dowel or a thick dowel stake into the ground behind each tombstone so wind can’t tip them over. Fill each with a handful of pebbles for weight.
- Ground the vignette. Scatter faux black foliage and dead-looking stems around the base, plus two or three loose foam leaves. Without ground cover the tombstones look like they’re floating.
- Add one figure. A plastic skeleton leaning at an angle, or a plastic crow on top of the tallest stone, gives the scene a focal point and a bit of humor.
Keep the cluster tight, maybe six feet wide, and put it slightly off the walkway so arriving guests pass it rather than step around it. That placement is what turns a pile of foam into a scene.
Common Mistakes
Almost every disappointing budget decoration traces back to one of these five problems. Each one is quick to fix once you know what to look for.
Using the wrong adhesive
Hot glue on paper, paint, or fabric beads through the surface and dries brittle. Use mod podge or craft glue for paper, fabric paint for anything textile, and hot glue only as a structural bond on the back of pieces. Save a glue gun for attaching googly eyes and chenille stems, which is what it’s genuinely good at.
Moving pieces before the paint is dry
Acrylic paint that feels dry to a fingertip can still be soft underneath. Set painted pieces on a flat surface and wait until they’re dry all the way through before stacking or transporting them. Moving them early is why the bottom of a lid sometimes prints onto the table.
Overcrowding a display
The most common version of this mistake is a mantel with fourteen small items and no negative space. Pick five to seven objects per surface, vary the heights by a foot or so, and leave bare space between them. Blank space reads as styling; crowding reads as storage.
Using real candles near fabric
Gauze, tulle, and painted paper ignite quickly and can catch a curtain. Switch to battery-operated LED tapers and tea lights anywhere decor, greenery, or fabric is close. They also save you from a melted wax puddle on a painted apothecary bottle. Keep anything burning, including a candle warmer, on a hard surface with clearance from decorations and out of reach of kids and pets.
Putting light plastic outdoors without weights
Outdoor decor fails from wind, not weather, and it fails within one gust. Stake every foam piece, fill hollow items with pebbles or sand, and skip anything tall and narrow with no base. Move plastic indoors for the week after Halloween if you want to keep it.
Forgetting to match the palette
Four projects made on four different evenings in four color schemes looks like leftovers. Choose two colors plus black at the start, stick to them, and you’ll have a display that reads as one idea.
Frequently Asked Questions
What are the best dollar store supplies for Halloween decorations?
The most useful buys are plain mason jars and bud vases, unfinished wood plaques, simple picture frames, neutral woven table runners, plastic storage baskets, foam board, faux pumpkins, plastic skeletons, matte black acrylic paint, one spray paint can, and cardstock. Jars, frames, and baskets give you a blank surface to finish, and the paint and paper turn any of them into Halloween decor. Pick bases in neutral colors so you can recolor them for another season later.
What craft paint works best on glass and plastic decorations?
For glass, use acrylic craft paint made for glass or multi-surface paint, and always wipe the surface with rubbing alcohol first to remove oils. For plastic, scuff the surface lightly with sandpaper so the paint has texture to grip, then use acrylic or multi-surface paint. Matte finishes photograph better than glossy. Let each coat dry before the next, and seal finished glass with a clear coat if you plan to reuse it.
How can I make dollar store decorations look more expensive?
The difference is finish, not price. Spray painting plastic pieces matte black immediately removes the factory shine that reads as cheap. Distress everything with sandpaper and a dry brush, use a limited palette of two colors plus black across the whole display, and mix real materials like burlap, wood, glass, and dried stems rather than plastic alone. Group items in odd numbers at varied heights instead of lining everything up evenly.
Are battery-powered candles safe for indoor Halloween decorations?
Yes, and for most indoor Halloween displays they’re safer than real flames. LED candles carry no fire risk near gauze, tulle, dried stems, or painted paper, and they can sit unattended in a display where a real candle could tip or run wax onto a finished surface. Use flameless tapers in clusters of three or five, hide the battery pack under a tray or cloth, and set a light timer so they switch off overnight.
How do I make dollar store Halloween decorations last outdoors?
Choose materials that handle damp weather and stake them down. Foam board and painted wood plaques survive a season better than thin plastic, and clear outdoor sealant adds years to a finished piece. Weight every hollow item with pebbles or sand, push a dowel stake behind anything tall, and set displays along a wall rather than the open lawn, where wind takes them. Bring plastic pieces in after Halloween so they stay reusable.
Can I use regular glue and scissors for these projects?
Yes for most of it, with two exceptions. Skip the hot glue gun when you’re attaching paper, fabric, or painted surfaces, since it bleeds through and dries brittle; use craft glue or mod podge there, and reserve hot glue for structural bonds like googly eyes. Any pair of scissors handles cardstock labels and burlap, though a craft knife gives you cleaner edges on foam board and stencils.
Conclusion
Start with one focal piece instead of six. The mason jar lanterns or the wall sign will set the palette and tell you what the rest of the display should feel like, and finishing that one well takes less time than starting three things and abandoning them.
Then hold to two colors plus black across every project, and let real materials do part of the work. Burlap, glass, wood, and dried stems cost almost nothing next to the plastic, and they’re what makes a budget setup look chosen rather than assembled.
Store each piece flat or boxed, label the bin, and next October you’ll rebuild the display for almost nothing. That reuse is the real return on a dollar store haul, and it’s why I stopped buying pre-made decor years ago.