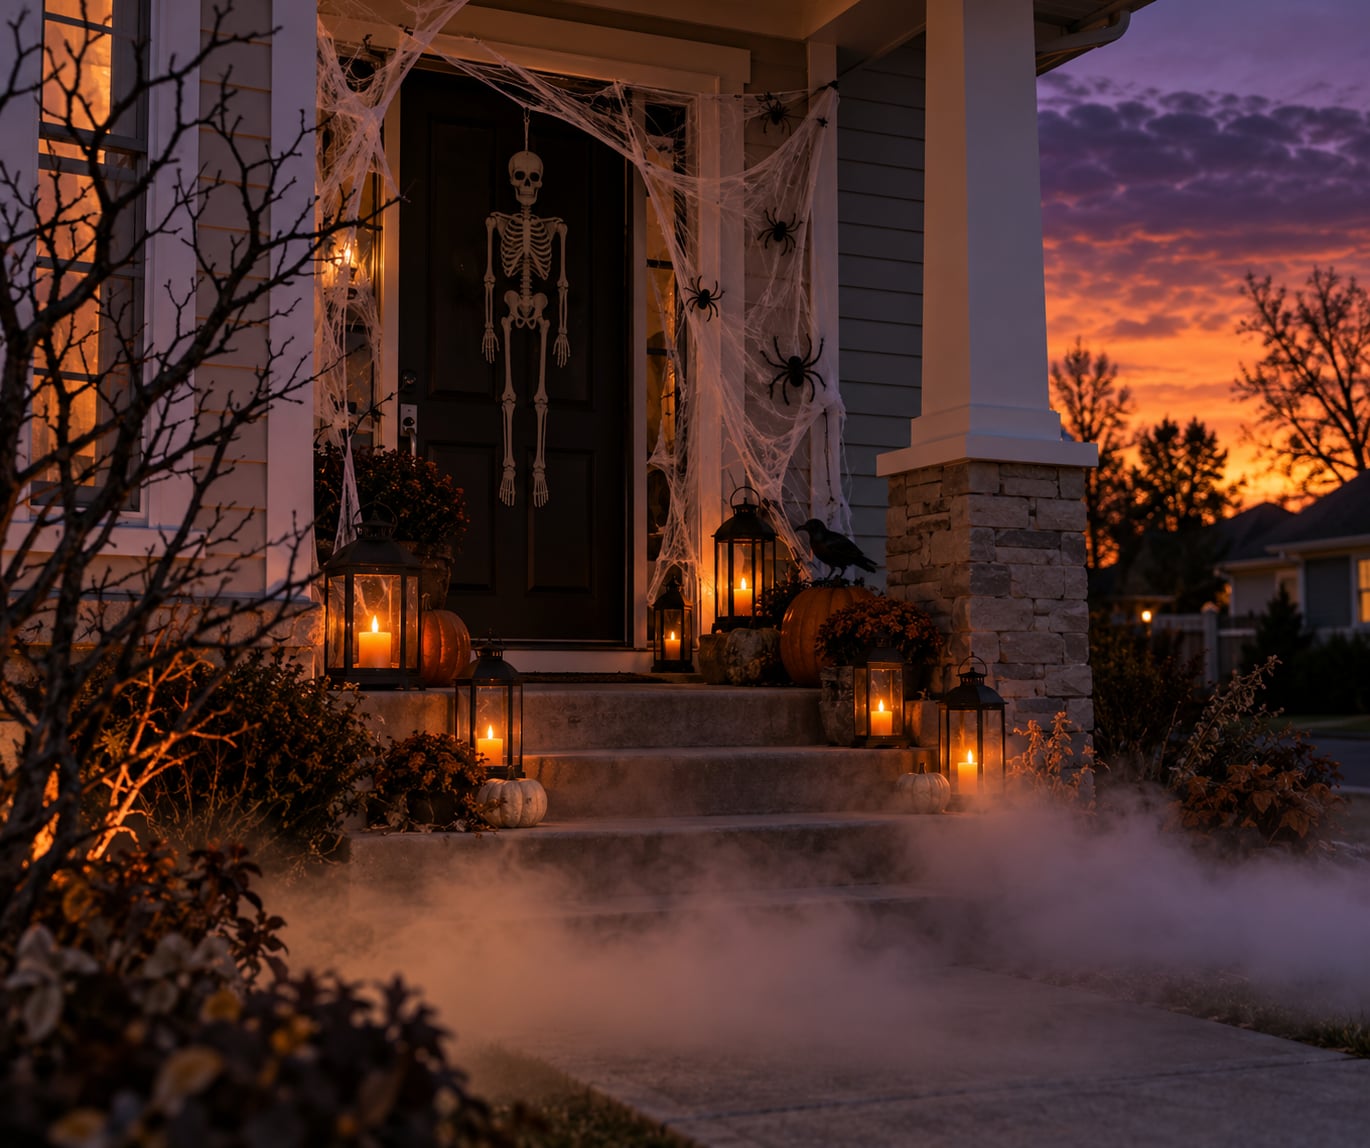
A creepy front door entrance for Halloween is a themed scene built around the door and the space immediately around it, layered in this order: the door surface, the frame and porch ceiling, props at three different heights, lighting, sound, and finally the steps and walkway. Layering is what separates a scene from a pile of stuff.
The whole project fits into an evening for a couple of people, and a tight budget buys most of the effect because the impact comes from lighting and sound rather than expensive props. Hardest part is usually the door itself, because you have to treat a vertical surface that people look at from four feet away.
Below is the order I would build it in, what it costs to build versus what it costs to buy, and what to change if you are renting, have no yard, or have small children on your street.
Table of Contents
- What You’ll Need: Materials by Budget Tier
- Tight budget
- Middle budget
- Go-all-out budget
- How to Make a Creepy Front Door Entrance for Halloween: Step by Step
- Step 1: Pick a theme and a scare level
- Step 2: Treat the door itself
- Step 3: Frame, columns and the porch ceiling
- Step 4: Place props at three heights
- Step 5: Light the scene in layers
- Step 6: Add sound and hide the source
- Step 7: Cover the floor, steps and walkway
- Step 8: Add the small details that reward a closer look
- Step 9: Test it after dark, then at noon
- Lighting: What Actually Makes a Front Porch Look Scary
- Sound Effects Most People Forget
- Build It or Buy It: What to DIY
- Apartment and Renter Front Door Ideas With No Yard
- Kid-Friendly vs Maximum Scare
- Common Mistakes That Ruin a Halloween Entrance
- When to Put Decor Up and How to Store It
- Frequently Asked Questions
- How do I decorate a front door for Halloween without damaging it?
- How to decorate an entryway for Halloween when there is no yard?
- How do I make my house look creepy for Halloween without scaring small children?
- What is the best way to light a front porch for Halloween?
- How do I decorate a front gate for Halloween?
- What Halloween decorations can I put on a front porch that survive rain?
- Start With These Three Things
What You’ll Need: Materials by Budget Tier
Buy the lighting and the sound first. Those two carry the scare, and they are the cheapest things to add and the most expensive to imitate well with cardboard.
Tight budget
- Black and orange spray paint, plus a pack of plain black foam balls or plastic spiders
- White yarn or string for fake cobwebs, stretched into the door frame corners
- A roll of black Halloween webbing or stretchy gauze for the door edges and railing
- Cheesecloth or muslin, torn into strips, for wrapping, hanging and drifting
- A battery tea light pack, a small Bluetooth speaker, and a bag of florist wire
- Cardboard, a hot glue gun and black tape for building gravestones and bone piles
Middle budget
- Everything in the tight tier, plus a set of solar stake lights pushed along the walkway
- A set of coloured string lights and a warm-white LED strip for the porch ceiling
- One larger anchor prop: a life-size skeleton, a hanging ghost, or a cloaked figure
- Foam pumpkins you carve and string together as your own flickering-flame lights
- Black lanterns and a battery-powered projector for a silhouette on the wall
Go-all-out budget
- Everything above, plus a motion-activated prop or animatronic near the path
- Faux black wood planks to build a real door wrap, so the door itself disappears behind boards
- Outdoor-rated string lights, a projector with interchangeable scenes, and a fog machine rated for outdoor use
- Weatherproof caulk clips and weighted bases so nothing goes airborne in a gust
What survives a month outdoors matters more than what looks expensive. For durability, this is roughly how the common materials hold up.
| Material | Best use | Rain and wind | Stores for next year |
|---|---|---|---|
| Cardboard | Gravestones, bone piles, monster mouth | Fails in a wet week, use foam instead | No, discard |
| Foam board | Cut-out skeletons, tombstones | Holds up, but light in wind | Yes, flat |
| Cheesecloth and muslin | Hanging ghosts, wrapping, drifting cobweb | Wet but still hangs; dry flat for next year | Yes, washable |
| Spray-painted MDF cutouts | Oversized silhouettes on the wall | Good, needs a weighted base | Yes |
| Faux wood planks | Door wrap, gate covering | Very good, screws or clips on | Yes |
| Paper webs and doilies | Quick corner cobwebs | Destroyed by a shower | No, buy cheap and use inside |
| Stretchy spider webbing | Door frame, railing, plants | Holds if anchored at both ends | Yes |
For a sourcing note: seasonal decor availability shifts year to year, so if a specific store is your plan B, shop that tier first rather than leaving it to the week before Halloween.
How to Make a Creepy Front Door Entrance for Halloween: Step by Step
Build from the door outward, and get the lighting in before you hang anything that blocks it. Nine steps cover a full entrance, and you can stop after step four and still have a scene that works.
Step 1: Pick a theme and a scare level
Decide this before you buy anything, because it determines the colour, the sound and how much you can justify scaring a seven-year-old. Three tones cover most houses: a haunted house with aged wood and candlelight, a graveyard with tombstones and fog, and a creepy-but-not-scary version for streets full of small children.
Haunted house reads well on a narrow porch and costs almost nothing. Graveyard needs ground space, so it does not work for apartments. The friendly version uses the same lighting and sound but swaps anything with a face for cobwebs, bones and empty frames.
Step 2: Treat the door itself
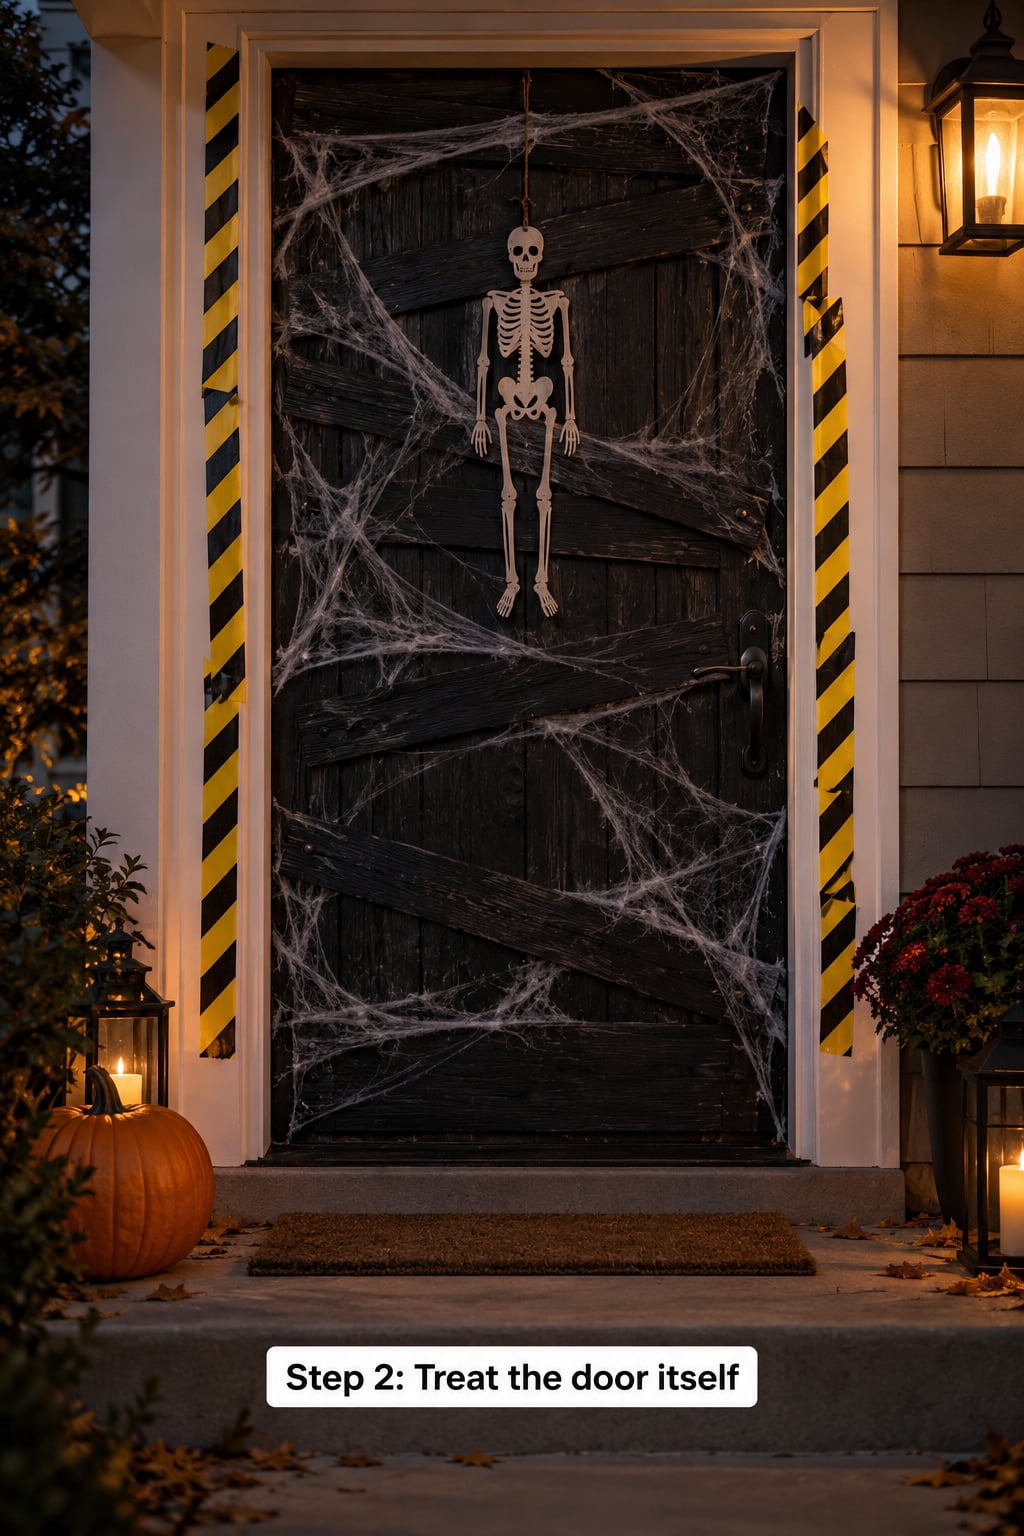
The door is the only surface every trick-or-treater touches, so it deserves more than a wreath. Cover it in vertical black faux wood planks, tape, or a single sheet painted to look boarded up, and leave a narrow gap so the door still opens.
Wrap the door pull and the frame corners in black webbing, and push a small mirror or LED light into the gap so the door looks like it is being watched from inside. On a double door, treat each leaf separately so the centre seam reads as a deliberate join rather than a gap.
Attach everything with removable strips and hot glue on a sacrificial cardboard backing wherever you can, so removal on November 1st takes minutes.
Step 3: Frame, columns and the porch ceiling
Most entrances go wrong at eye level. Add stuff overhead: hanging ghosts cut from foam board, a witch hat on a fishing line, or cheesecloth strips hung from the ceiling beams to create movement.
Stretch cobwebs from the ceiling corners down to the railings and the floor, in four or five long strands rather than a thick mat. Spiders on the strands at mixed heights sell the scale, and one very large spider reads better than a cluster of small ones.
Step 4: Place props at three heights
Depth is what makes a porch look composed instead of stuffed. Put something at ground level, something at eye level, and something overhead, and spread the pieces across the width rather than clustering them in the middle.
Ground level is where trip hazards live, so keep it to flat things: a bone pile, a folded skeleton lying down, painted gravestones, a scatter of plastic leaves. Eye level is the rocking chair with a seated skeleton holding a lantern, the cloaked figure by the rail, the witch’s broom leaning in the corner.
Overhead is the hanging ghost, the bat strings, the chandelier made from a wreath and old skeleton hands. Check that nothing hangs low enough to catch a hood or a shoulder.
Step 5: Light the scene in layers
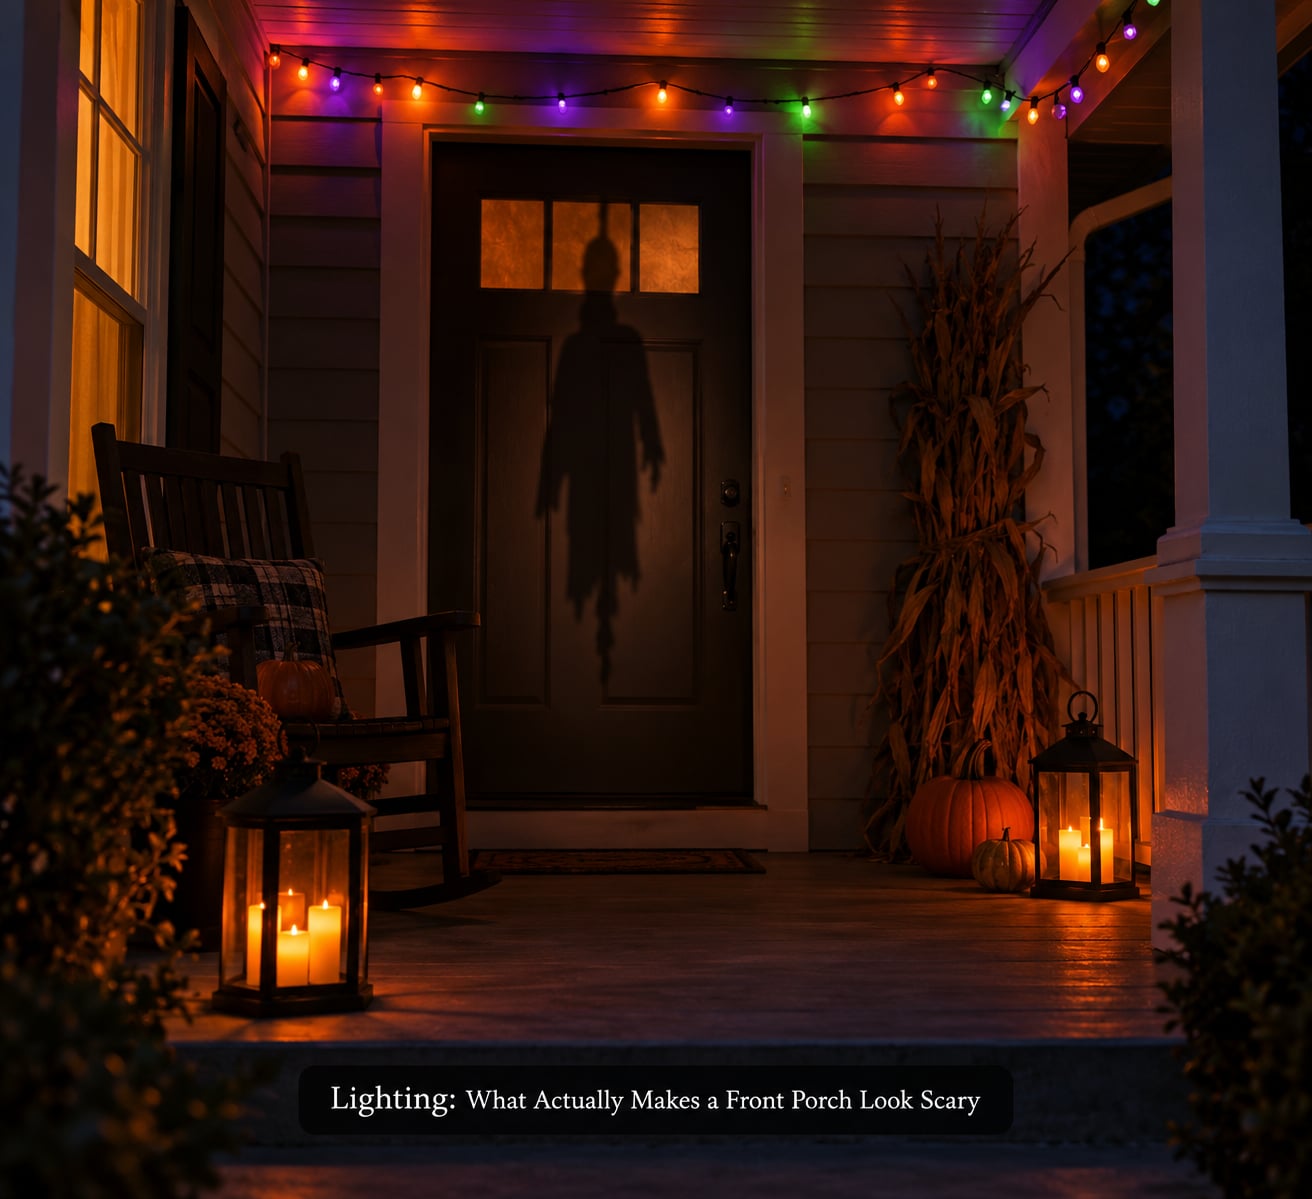
Three layers, always: a base layer so the entrance is visible and safe, an accent layer that colours the scene, and one moving light that draws the eye.
Base is warm white along the steps and the door number. Accent is orange or deep purple in the cobwebs and behind gravestones, kept off the walking surface. The moving layer is flicker, a slow sweep, or a shadow that passes across the wall.
Step 6: Add sound and hide the source
A silent entrance is only half as unsettling. One speaker does more than a sound board, and it should play a looping ambient track rather than single clips.
Stack the layers: a low drone underneath, occasional knocks and footsteps on top, and one movement-triggered clip that fires when someone crosses the walkway. Keep the volume at conversation level, aimed at the approach rather than out to the street, so it does not carry to neighbours.
Hide the speaker inside a hollowed-out cauldron, behind a column, or inside a large cauldron prop. Speakers inside metal buckets sound more outdoor than the box they came in.
Step 7: Cover the floor, steps and walkway
The ground plane is the most under-decorated part of most entrances. Fake leaves, torn black sheeting scattered in patches, and thin foam grave markers laid flat fill the space without blocking it.
For the walkway, stake solar lights along the path edge, or set battery tea lights inside glass jars at the base of the steps. Anything on a step should be flat, heavy enough not to shift when a foot lands near it, and visible enough to be stepped around.
Step 8: Add the small details that reward a closer look
Details are what separate a display people walk past from one that makes them stop. A handprint of fake blood on the inside of the door, a stack of letters, a porch light switch labelled wrong, a framed portrait gallery wall where every face has been scratched out with black paint.
A doormat that does not match, a pair of muddy footprints leading away from the door rather than toward it, and a single jack-o’-lantern set slightly lower than the rest all read as intentional. Keep this layer to five or six pieces, and stop.
Step 9: Test it after dark, then at noon
Stand at the kerb at dusk with the lights on and watch your entrance the way a trick-or-treater will. If you can see everything in one glance, add a layer. If it looks cluttered, remove the nearest thing rather than adding.
Then look at it the next morning. Displays that depend on darkness often look like discarded rubbish at nine in the morning, which is exactly when neighbours and any landlord walk past.
Lighting: What Actually Makes a Front Porch Look Scary
Warm white and colour do different jobs, and most amateur setups use only one. Here is how the common types compare.
| Lighting type | Effect | Power | Best placement |
|---|---|---|---|
| Flickering LED tealights | Firelight, no flame, no heat | Battery, weeks of run time | Inside lanterns, at ground level |
| Coloured string lights | Colours the whole scene in one go | Battery or outdoor-rated cord | Under the ceiling, along the railings |
| LED strip | Clean edge light on the door frame | Low-voltage adapter | Tracing the door outline |
| Solar stake lights | Guides the eye down the walkway | Solar, charges by day | Along the path edge |
| Projector | Moving silhouette, a face on the wall | Mains adapter | Aimed at siding beside the door |
| Single spotlight | Uplights a prop from below | Mains cord, must be outdoor rated | Behind gravestones or a figure |
Whatever you use, the rule is that a trick-or-treater must be able to see the step edge clearly enough to place a foot on it. Scary is a look, not a stumble.
Sound Effects Most People Forget
Sound is the least-covered layer in Halloween entrance guides and the one people ask about most. The trick is looping ambience, not a one-shot scream.
- Base drone: a low looping rumble or wind track at barely-there volume, running all evening.
- Intermittent events: a knock, a floorboard creak, a distant crow, spaced so a visitor never hears the pattern repeat.
- Movement trigger: a clip that starts when someone crosses the walkway, ideally on a cheap motion sensor wired to a small speaker.
- Seasonal layer: one short burst of louder audio timed to your own front-of-house moment rather than left to run all night.
Test the whole setup from your neighbour’s front yard. If they can identify the sound at their door, it is too loud or aimed wrong.
Build It or Buy It: What to DIY
Some props are worth making and some are worth buying. The deciding factor is outdoor durability, not price.
| Project | Build or buy | Build time | Difficulty | Holds up outdoors |
|---|---|---|---|---|
| Door wrap or boarding | Build | 45-90 min | Easy | Yes with faux wood |
| Cobwebs and spiders | Buy | 10 min to place | Easy | Stretchy webbing only |
| Hanging ghosts and cheesecloth | Build | 20-30 min each | Easy | Yes, and reusable |
| Gravestones and bone piles | Build in foam | 1-2 hours | Medium | Foam yes, cardboard no |
| Large anchor prop | Buy | None | None | Yes |
| Lighting | Buy | 1 hour to place | Easy | Depends on rating |
| Sound setup | Build | 30-45 min | Medium | Keep electronics dry |
| Doormat and entry dressing | Buy | None | None | Yes |
Apartment and Renter Front Door Ideas With No Yard
No lawn, no porch, shared hallway and someone else’s door in the frame. This is the version most guides skip, and it can still look deliberate.
Work the door itself, because that surface is yours: a wreath, a taped X of webbing, a printed skeleton pinned flat with removable strips, or a full temporary cover on removable adhesive. Keep every attachment on the door, never on the frame or the brick, which usually belongs to the landlord.
Use the walkway you do have. Apartment balconies and shared corridors can carry a floor scene, a runner of black sheeting and battery tea lights inside jars on the ground, plus one hanging element from an overhead beam or hook that is already there.
Front gates work the same way. Wrap the bars with stretchy webbing, hang two or three ghosts at staggered heights, and cluster lanterns at the base. A gate is a frame people look through, so leave the middle clear.
For a hallway, sound travels further than you think. Keep audio to your own door, low, and off after the last visitor.
Kid-Friendly vs Maximum Scare
How creepy to go is a judgement call about your street, not about the props. Small children, older neighbours, pets on the lead and anyone with a sensory sensitivity all change the answer, and the cost of guessing wrong is a complaint rather than a compliment.
| Scare level | Props | Lighting | Sound |
|---|---|---|---|
| Friendly | Cobwebs, bones, cartoon jack-o’-lanterns, no faces | Warm white with orange accents | Ambient only, no movement trigger |
| Classic | Skeletons, cloaked figures, gravestones | Coloured string lights plus flicker | Drone with intermittent knocks |
| Maximum | Animatronics, blood, distorted faces | Projector, spotlight, heavy colour | Movement-triggered with a burst at the door |
Street with lots of under-tens: start at friendly and keep the sound low. Street with teenagers and an adult party: classic works. Only go maximum if you know your visitors.
Two small things that make any version safer without dulling it. Keep the whole approach walkable in daylight, and put a small step light on any change in level so nobody arrives in the dark and drops.
Common Mistakes That Ruin a Halloween Entrance
Real flames. A candle in a cheesecloth ghost is a fire waiting for a dry October wind. Flameless LED tealights look nearly identical in a dark entrance and cost very little.
Trip hazards and low strings. Nothing hanging below head height, nothing loose on a step, and no cords crossing a walking surface. Run extension cords along the edge of the porch or under a mat, and use outdoor-rated ones only.
Decor that dies in the rain. Paper webs, cardboard and thin foam go first. If rain is likely, shift your build to cheesecloth, faux wood and weighted foam so a wet weekend does not cost you the display.
Wind. Anything hollow catches air. Weight bases, stake tall props, and skip hanging anything large on a first-floor wall where the gusts are strongest.
Daylight embarrassment. A display that only works at 9pm reads as rubbish the next morning to anyone walking past with a coffee. Choose props that look intentional without lights, and put the light show inside the window rather than on the whole exterior.
Noise and neighbour relations. If your sound carries, it is aimed wrong or too loud. A quick conversation with the neighbours on both sides before Halloween week prevents most complaints.
When to Put Decor Up and How to Store It
Put up what can take the weather two to three weeks early, and leave the rest to the weekend before Halloween. Stakes, lighting and the door wrap handle rain and pedestrians. Paper, webs and anything that could be stolen or vandalised go up on the day of, ideally in the evening.
Photograph the finished entrance from the kerb before you start taking it down. That photo is the single most useful thing for next year, because it beats rebuilding the layout from memory.
Take it down in reverse order, and store by material. Cheesecloth and muslin come down and get washed. Foam cutouts lie flat in a bin. String lights and battery lights go in a labelled box with their batteries removed. Anything mounted with tape comes off while the adhesive is still workable, not a month later.
Label the boxes by zone, door, railings, walkway, so next October you rebuild in one evening instead of two.
Frequently Asked Questions
How do I decorate a front door for Halloween without damaging it?
Use removable adhesive strips for anything on the door slab itself, and keep screws and permanent strips off the frame, brick and trim, which usually belong to someone else. Mount lightweight props on a cardboard backing and peel the whole thing off as one piece. Push test strips into a low corner first, and remove them within a couple of days so adhesive does not set permanently.
How to decorate an entryway for Halloween when there is no yard?
Treat the door as the scene, since it is the surface every visitor passes. Add a full removable cover or a taped cross of webbing, cluster battery lights and a cloaked figure at the base, and hang two or three ghosts at staggered heights from any existing hook or beam. Shared hallways, balconies and gates all work with the same pieces, just fewer of them and no graveyard on the ground.
How do I make my house look creepy for Halloween without scaring small children?
Keep the lighting, the cobwebs and the sound, and drop anything with a face. Bones, gravestones, empty frames and a warm orange glow read as spooky to a child and as decoration to an adult. Use ambient sound only, no movement-triggered audio, and keep the volume at conversation level. Set any animatronic on the friendly version or skip it entirely.
What is the best way to light a front porch for Halloween?
Work in three layers. A base layer of warm white light on the steps and the door number so the surface is visible and safe, an accent layer of orange or purple in the cobwebs and behind props, and one moving element such as flicker or a projected shadow to draw the eye. Battery tealights inside lanterns and coloured string lights under the ceiling do most of the work for very little.
How do I decorate a front gate for Halloween?
Treat the gate as a frame people look through, so leave the middle clear. Wrap the bars with stretchy spider webbing, hang two or three ghosts or a wreath at staggered heights, and cluster black lanterns with battery tealights at the base. Weight anything tall against gusts, and keep decorations off the hinges and the latch so the gate still closes properly.
What Halloween decorations can I put on a front porch that survive rain?
Choose by material rather than by look. Faux wood planks, spray-painted MDF cutouts, weighted foam, cheesecloth and glass jars with battery lights all handle wet weather. Avoid cardboard, paper cobwebs and doilies, which collapse after a single shower, and bring any speaker or electronics under cover. Weight bases and stake tall props, since wind usually causes more damage than rain.
Start With These Three Things
Cover the door, light the frame, and put sound at the base of the steps. Those three carry most of the effect and take the least time, and the rest of the layers are decoration on top of something that already works.
Build the door two or three weeks early if the weather is settled, hang the paper and the webs the day before, and photograph it before teardown so next October takes one evening instead of a weekend.