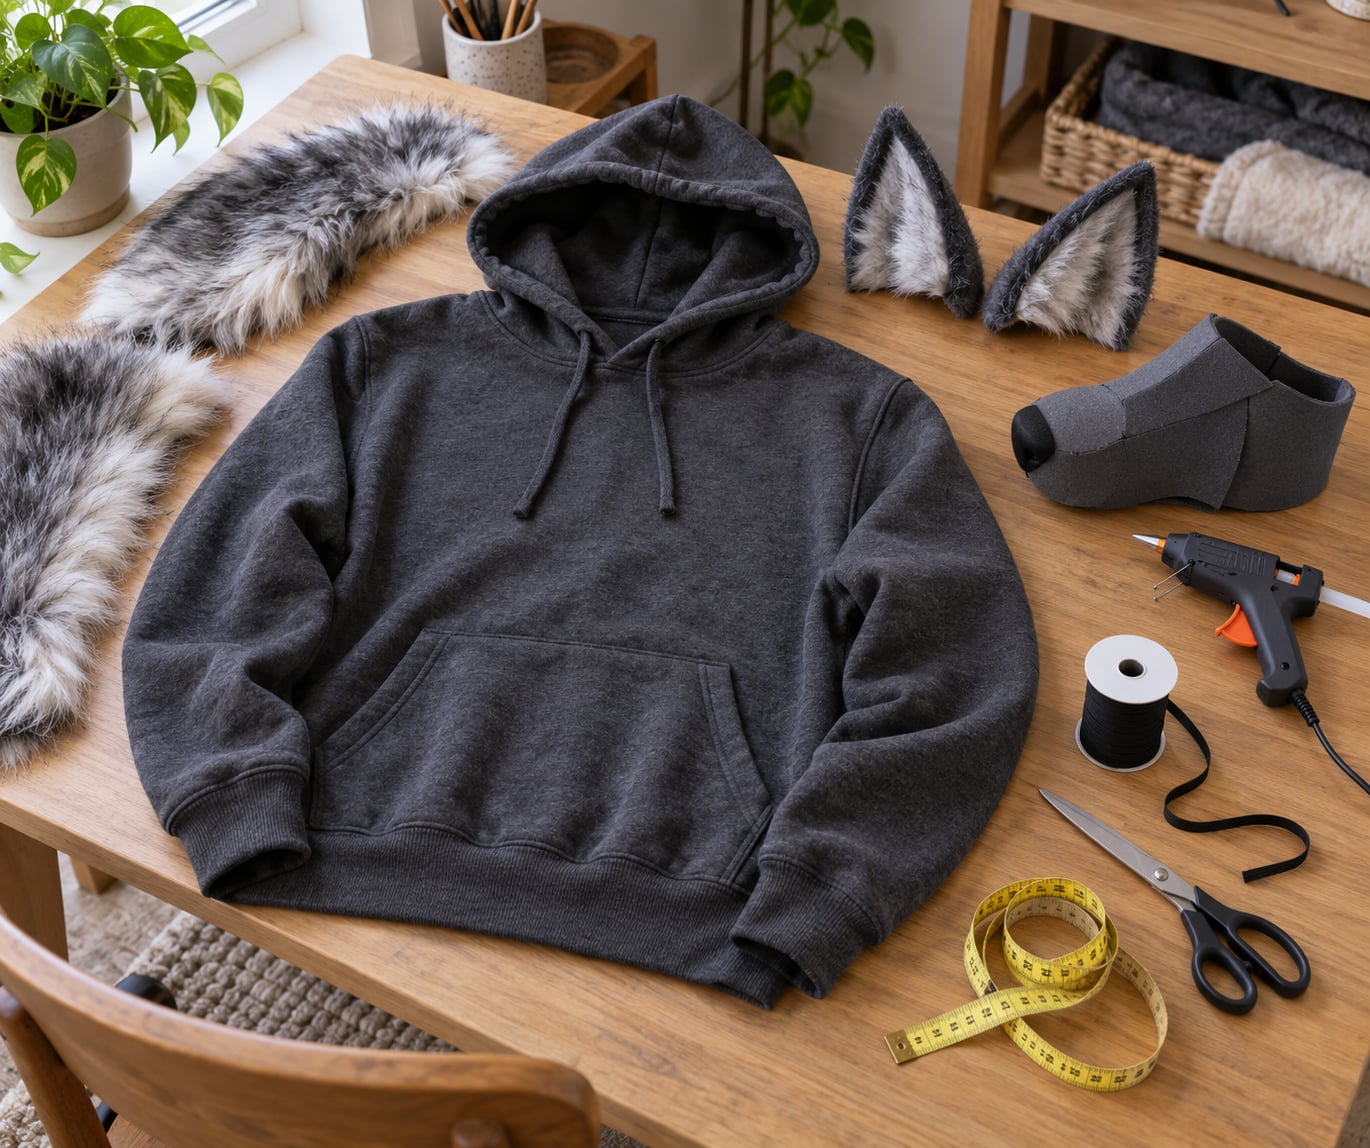
To make a werewolf costume with a hoodie, you need four things working together: a dark hoodie worn loose for bulk, pointed wolf ears fixed to the hood, a protruding snout or painted muzzle, and clawed hands. Add a bushy tail and some fake blood and it reads as a werewolf from across a street. The whole build takes about three hours plus drying time and needs no sewing machine if you use a hot glue gun.
Table of Contents
- What You Need
- The hoodie and base layers
- For the head and body
- Optional upgrades
- Step-by-Step: How to Make a Werewolf Costume with a Hoodie
- 1. Choose the right hoodie
- 2. Add the werewolf body shape
- 3. Make the hood look furry
- 4. Build the muzzle and facial features
- 5. Add fur, claws, and costume details
- 6. Finish the makeup and test the full costume
- Common Mistakes
- The costume gets too hot
- The fur looks stiff or matted
- The muzzle wobbles or falls forward
- Vision is blocked
- The makeup looks like costume makeup
- Ears or tail detach mid-night
- Frequently Asked Questions
- What color hoodie should I use for a werewolf costume?
- Can I make this werewolf costume without sewing?
- How do I keep a werewolf costume comfortable for a child?
- Where do I buy the main materials?
- Should I wear a werewolf mask instead of face paint?
- Start With the Ears
What You Need
Everything below comes from a craft store, a dollar bin, or a drawer in your house. Spend an hour gathering it before you start, because hunting for a glue gun halfway through step four ruins an evening.
The hoodie and base layers
- One dark hoodie — gray, black or dark brown, in your size or one size up
- A long-sleeve base layer or two, if you plan to add padding
- Distressed jeans or dark trousers
- Sturdy boots with a good grip
For the head and body
- Craft foam or thin craft foam sheets, plus a hot glue gun and spare glue sticks
- Felt in black, white and gray for the ears
- Faux fur trim, roughly one to one and a half yards, in gray or brown
- Black acrylic paint, a small brush and white paint for teeth
- Elastic, a strip of sturdy cardboard or a cut-up plastic laundry bottle for the tail
Optional upgrades
- Yellow or amber contact lenses
- Fabric glue or iron-on fusible fleece if you have a sewing machine
- Spare snaps or safety pins for reattachment on the night
- Spray paint in dark brown or black for the claws and dirt on the jeans
On fit: buy the hoodie a size larger than you wear, or plan to layer a sweatshirt underneath. A costume you cannot sit down in gets abandoned by 9pm.
Step-by-Step: How to Make a Werewolf Costume with a Hoodie
1. Choose the right hoodie
Pick a solid dark color with no logo across the chest. Logos fight with the fur trim and read as a branded sweatshirt rather than a creature, and light colors show every drop of fake blood.
Cut or tear the hem, cuffs and elbows slightly, then scuff the fabric with sandpaper or a wire brush. That worn-in texture is what stops a new hoodie from looking new. Test it by holding the hoodie up under a lamp: if the tears read clearly, they are deep enough.
2. Add the werewolf body shape
A werewolf reads as bulky and hunched, not as a person in a hoodie. Add bulk across the shoulders with two pieces of craft foam, 12 to 14 inches wide and 8 inches deep, curved with scissors and glued inside the hoodie at the shoulder seams.
Fill the chest with loosely rolled batting or polyester fill so the torso reads a size or two larger than your frame. Keep it light. If you cannot lift both arms overhead, you packed too much. Give yourself a two-minute arms-up test before you glue anything down.
3. Make the hood look furry
Cut two ear shapes from felt, each about 5 inches tall at the base for an adult, and fold the bottom third over so the ear stands up. Add a smaller inner-ear piece in a lighter felt and glue that on before the outer ear is set.
Place the ears about 3 inches apart along the top of the hood, where the fabric is thickest, not on the soft fleece brim. Whip a few stitches through the ear base with heavy yarn, or sandwich the base between two squares of felt glued to the hood so nothing shows.
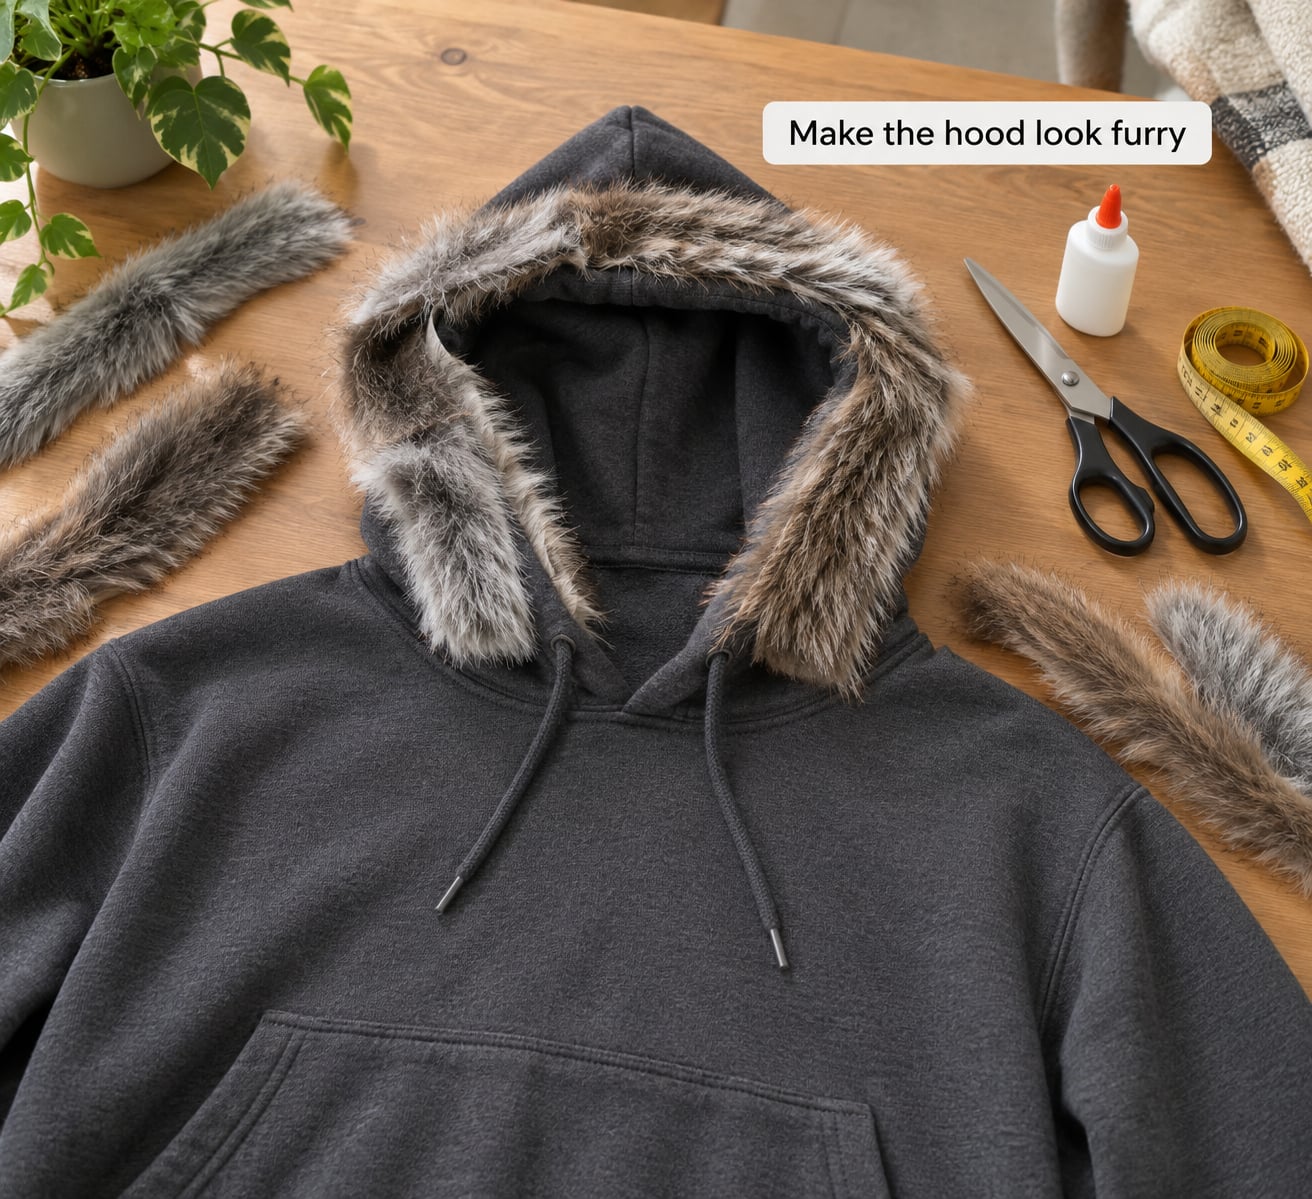
For the fur, work in strips around the hood opening so the pile points outward and away from the face. Leave a gap of about 4 inches at the front or your forehead disappears. You know the placement worked when you can pull the hood up and still see straight ahead with the hood on.
Attach ears to the hood rather than wearing a separate headband. Headbands slip sideways and announce themselves as a costume accessory. Fixing the ears to the hood also keeps the silhouette clean.
4. Build the muzzle and facial features
A foam muzzle is the single biggest upgrade. Cut two stacked shapes from craft foam, an oval about 6 inches long and 4 inches wide, glue them face to face with the flat edges together, then curve the foam by hand or over the edge of a table so it sits away from your face.
Glue on a rounded black foam nose at the tip and paint the lower half of the muzzle black with a couple of coats of acrylic. Tear two small pieces of white card, glue them inside the mouth line as fangs, and paint the mouth line black.
Wear it on elastic, looped around the head under the hood. If you skip the muzzle entirely, paint a snout across your own nose and cheeks, add two drawn or foam fangs hanging from the upper lip, and go heavy on dark shading around the eyes and nose bridge. That version reads well in photos and stays cool for a full night out.
5. Add fur, claws, and costume details
Glue fur trim to the cuffs, the hem and down the front placket, always pressing the pile downward so it does not fight the direction of the fabric. Trim is easier than yardage here, and a small piece covers more than you expect.
Make claws from thin craft foam or stiff card: cut pointed triangles, curl them slightly, and tape or glue them to your fingertips. Black or dark brown spray paint keeps them from looking like cardboard. Detachable claws matter more than realistic ones, since you will want them off for eating and for opening car doors.
Tie the tail to an elastic waist belt rather than pinning it to the trousers. A belt sits higher, holds through a night of running, and never scratches. Build the tail from a strip of cardboard rolled into a tube, wrap it in brown or gray faux fur with a flap of glue along one seam, and leave the top end flat so it ties on.
Then dirty it. Torn flannel layered under the hoodie, ripped knees smeared with brown and black paint, fake blood on the hands and mouth, and a dark belt to break up the shape all cost nothing and do more for the look than any mask. Blot blood with a tissue to leave a mottled edge, never a clean stripe.
6. Finish the makeup and test the full costume
Work in this order: pale or grey base across the face, darker grey around the temples and cheekbones, black around the eyes and down the nose bridge, white highlights on the brow ridge and nose, then blood last.
Pull the hood up and walk to a mirror. Check three things: you can see without moving the hood, you can raise both arms, and you can sit down. Anything failing gets adjusted now, not an hour before trick-or-treating.
Then wear the whole outfit for thirty minutes indoors. Fur traps heat and glue on a new hoodie feels tight for the first ten minutes, and this is where you find out whether the ears wobble. Take a few phone photos in low light with a light behind your head, which is what sells the silhouette in a photo.
Common Mistakes
The costume gets too hot
Fur over the chest traps heat fast. Cut a small vent hole under each shoulder panel and skip fur across the front placket. Wear a thin base layer, not a thick one, and hydrate more than usual.
The fur looks stiff or matted
Glue cools too fast and you get lumps. Lay the trim in place, hold it with pins, then mist the glue lightly before pressing. For the hood, keep the pile direction consistent; fur fighting itself reads as a costume in every light.
The muzzle wobbles or falls forward
Foam needs a rigid core. Sandwich the curved foam between two cardboard side panels and glue those to the foam, then run elastic through small holes at each side rather than relying on the foam alone.
Vision is blocked
Ask someone in the room to tell you where your feet are while you walk. If they cannot, the hood brim or the fur is too low. Cut the front opening wider and press the fur back, since a werewolf that walks into a door is scarier to nobody.
The makeup looks like costume makeup
Flat grey is the giveaway. Layer two or three values, keep edges soft with a damp sponge, and leave the skin texture visible. Add blood and grime last, in small amounts, so the face still reads as a face.
Ears or tail detach mid-night
Carry a few safety pins and spare snaps, and test the attachment hard before you leave. Pin through the doubled fabric where the hood seam sits, never through a single thin layer.
Frequently Asked Questions
What color hoodie should I use for a werewolf costume?
Dark colors work best, and gray is the most forgiving because fur trim and blood both blend into it. Black reads as a modern, cleaner wolf. Brown and tan suit a barn-wolf or rural look, and any of them can be lightened with gray paint. Skip white and pastels, since they show every stain and reflect porch light straight back at your face.
Can I make this werewolf costume without sewing?
Yes, and most people do. A hot glue gun handles ears, fur trim and the foam muzzle on a hoodie. For the tail, roll cardboard and wrap it in fur with glue along one seam. The only thing glue cannot do well is attach anything to smooth fleece, so add a small square of felt as a bonding patch first.
How do I keep a werewolf costume comfortable for a child?
Size the hoodie one size up and skip fur across the chest, where it traps heat fastest. Test the full outfit for thirty minutes indoors before Halloween night. Check that the hood does not block vision and that both arms go overhead. For school-day wear, leave the muzzle and claws at home and keep the hood ears in place.
Where do I buy the main materials?
Everything here comes from a craft store or a dollar section: felt sheets, craft foam, faux fur trim by the yard, elastic, acrylic paint and hot glue sticks. Larger fabric markets and online fabric sellers carry wider color choices for faux fur. Search for printable felt ear patterns if you want symmetric ears without drafting them yourself.
Should I wear a werewolf mask instead of face paint?
Masks are hot and fog glasses within a few minutes, and they limit your vision, so most DIY builds skip them. A foam muzzle over your own face stays cooler and reads better in photos. If you want real scariness, go with layered face paint and fangs, and put the effort into the ears, hands and silhouette instead.
Start With the Ears
Learn how to make a werewolf costume with a hoodie by finishing one thing first: the ears. They set the silhouette, they cost almost nothing, and they tell you immediately whether the hoodie color and fur trim work together. Once the ears are on and the hood goes up, the rest is detailing.
Wash the hoodie, cut the ears, glue them on, and do a thirty-minute wear test. Everything after that is faster.