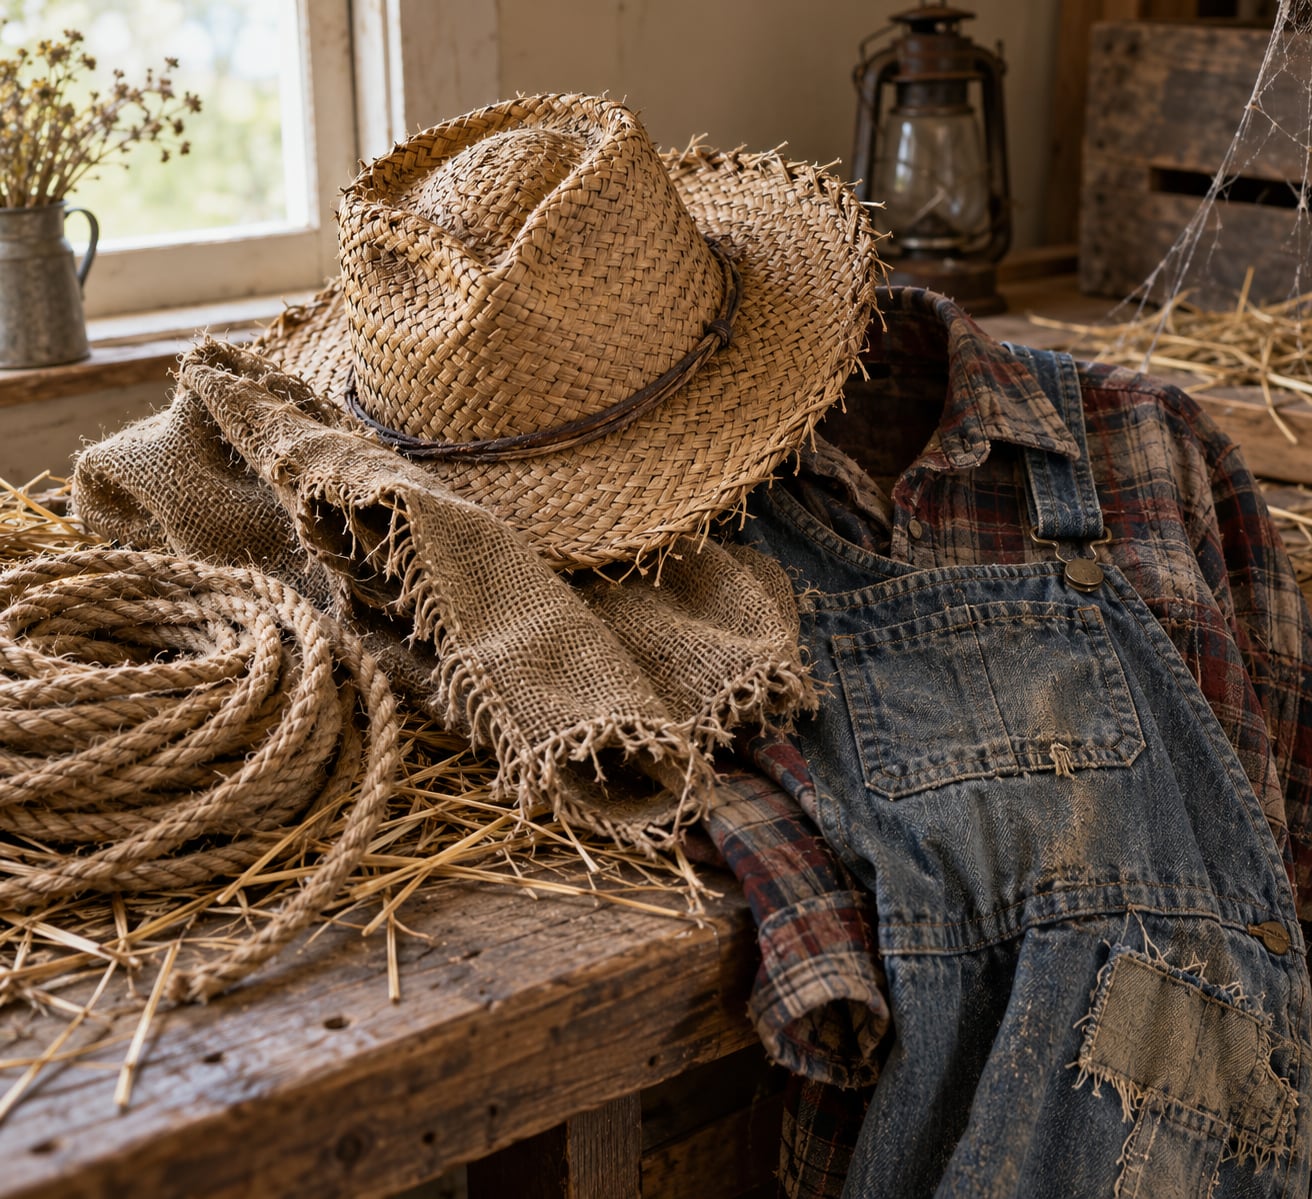
A scary scarecrow costume comes down to five things: a distressed flannel shirt, patched overalls frayed at the hems, rope tied at the neck, waist, wrists and ankles so the body looks held together, a battered straw hat, and a burlap face with dark hollow eyes. Build it in that order and you get a cornfield horror look in a single weekend, using mostly thrifted clothes.
Most people get the outfit right and the face wrong, which is why their scarecrow reads as a harvest festival decoration instead of something that unsettles people in the dark. Budget about four hours for a full build with a mask, or 30 minutes if you skip the head entirely and paint your face instead.
Table of Contents
- What You Need
- Frame and structure
- Clothing
- Head and face
- Distressing and finishing
- Safety gear and alternatives
- How to Make a Scary Scarecrow Costume Step by Step
- 1. Plan the Scarecrow’s Silhouette and Fit
- 2. Build the Wearable Frame
- 3. Create the Head and Disturbing Face
- 4. Add the Clothing and Rags
- 5. Make the Scary Details Look Authentic
- 6. Finish the Makeup and Final Fit
- 7. Test the Costume Before Halloween Night
- Common Mistakes
- An unstable frame that shifts while you walk
- Burlap scratching the wearer’s face
- Straw ending up all over the house
- Makeup that reads as flat and cartoonish
- Restricted vision and poor depth perception
- Overheating
- The costume coming apart during wear
- The hat sliding off
- Frequently Asked Questions
- How can I make a scary scarecrow costume at home?
- Do I need to build a frame to make a scarecrow costume?
- What can I use instead of straw for a scarecrow costume?
- How do I make my scarecrow costume scarier?
- Can I make a scarecrow costume with no sewing and no hot glue?
- How do you see out from under a scarecrow mask or burlap hood?
- Conclusion
What You Need
Everything below comes from a thrift store, a craft shop or the hardware aisle. Group it the way you’d actually shop, so you can gather in one trip.
Frame and structure
- Two 1.25 inch PVC pipes, about 3 feet each, for the shoulder bar and torso spine
- Pipe clamps or cable ties, plus duct tape or electrical tape for every joint
- One yard of natural jute rope for the bindings
- Optional: wooden dowels for the arm shape, or a length of flexible floral wire inside each sleeve
Clothing
- An oversized flannel or plaid button-up shirt, two sizes too big
- Baggy overalls or jeans, again oversized, with holes worn at the knees if you are lucky
- A wide-brim straw hat, deliberately crushed rather than tidy
- Work gloves, rubber boots or heavy shoes, and a neck scarf or bandana
Head and face
- 1 to 2 yards of burlap, or a purchased scarecrow mask
- Black pantyhose or tulle for the eye backing
- Craft stuffing, foam, or two round balls for a hollow-cheek effect
- Heavy needle and dark thread for the stitched mouth and cheek seams
Distressing and finishing
- Loose straw or hay, plus a utility knife and scissors for fraying
- Spirit gum, fabric glue, or a hot glue gun
- Black face paint, theatrical blood, sponge applicators, and brown or grey paint for grime
- Cobweb material, charcoal or soft pastel for bruised skin tones
Safety gear and alternatives
Wear a dust mask when you cut burlap, gloves when you handle PVC cutters, and clear safety glasses if you use a rotary tool. If anyone in the house has a hay or dust allergy, swap the straw for raffia, excelsior, shredded kraft paper, or plain polyester polyfill. Those cost nothing extra and they shed far less, which matters in a car on the way to a party.
How to Make a Scary Scarecrow Costume Step by Step
Work in this order and each stage stays testable. You can still fix a problem before the next layer hides it.
1. Plan the Scarecrow’s Silhouette and Fit
Decide your build tier before you buy anything. A beginner tier is thrifted clothes with rope and paint, about 30 minutes and no tools beyond scissors. An intermediate tier adds a burlap hood and stuffed arms, roughly four hours. An advanced tier builds the head from a foam blank or paper mache and adds rigid arms, which takes a weekend and real workshop space.
Then take three measurements: your shoulder width, your torso from shoulder to hip, and your height. Add 4 to 6 inches of shoulder width so the silhouette slumps instead of fitting. A scarecrow that looks too neat looks like a costume, and one that fits like a glove looks like a person in a costume.
2. Build the Wearable Frame
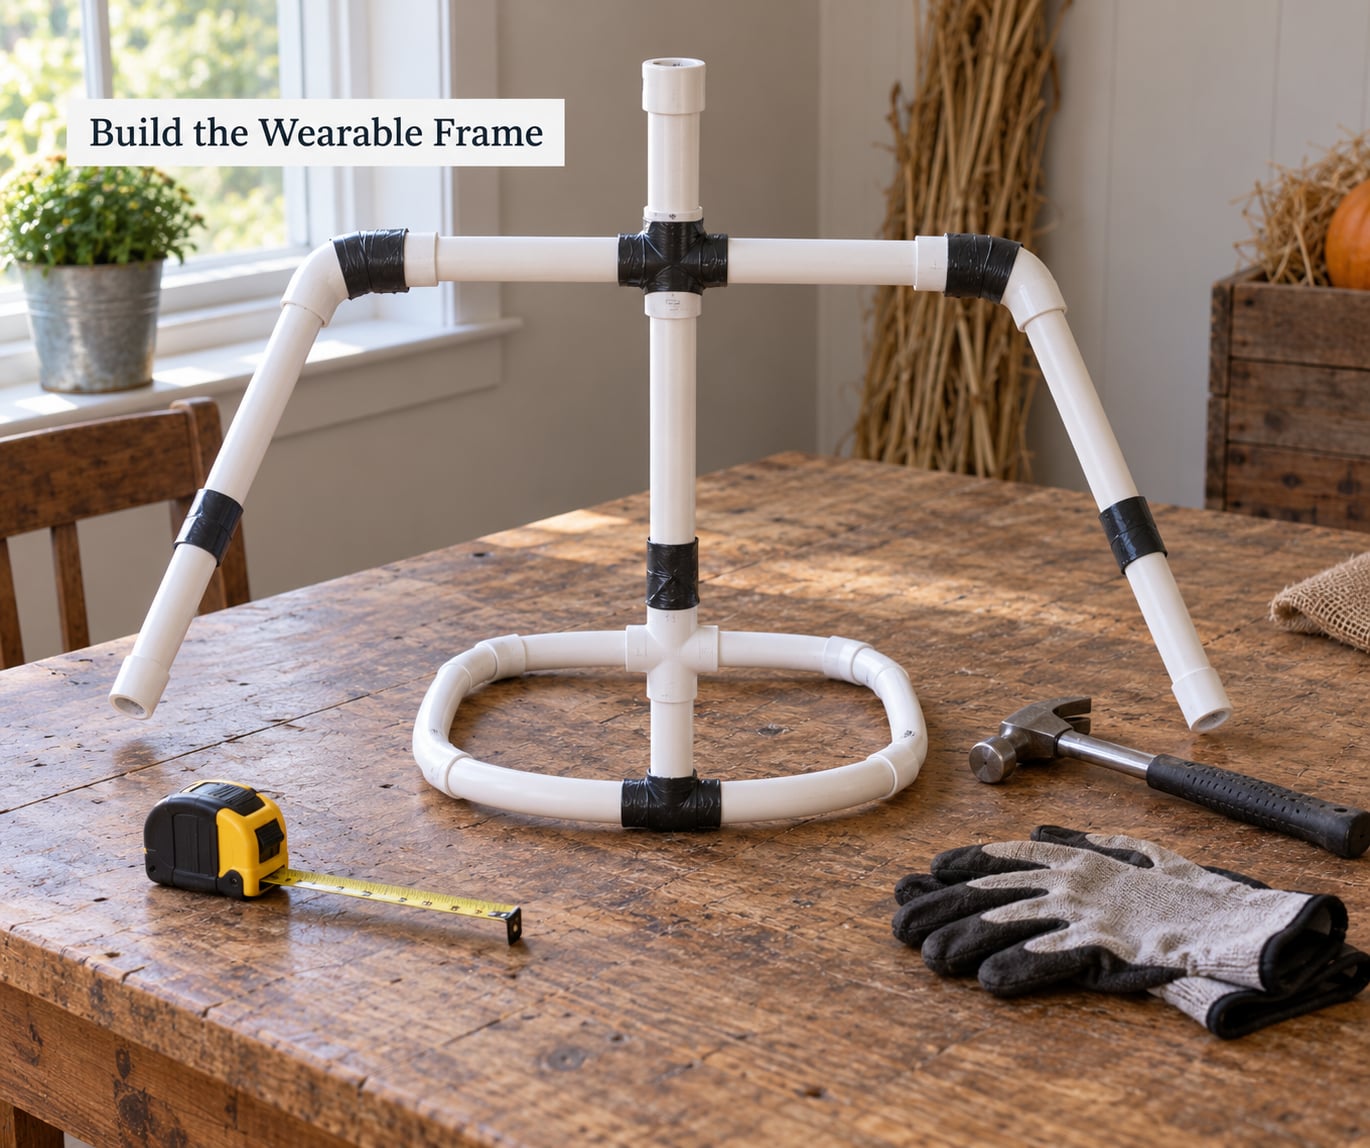
Cut the shoulder bar about 10 inches wider than your actual shoulders. Clamp it to the top of the torso pipe and wrap the joint in tape, then add diagonal braces running down and out to hold the shape at roughly a 30 degree slump. Bend the ends of the shoulder bar down to form stubby arms, or slip a dowel into each sleeve so the arms keep their shape when you fill them.
Test the frame over your clothes before you decorate anything. Put it on, lift both arms, sit down, and walk across the room. If it catches on the doorframe or digs into your shoulders, widen the shoulder bar now rather than after four hours of distressing. The visible result at this stage: a shoulder structure that drapes over clothing and stays put when you move.
3. Create the Head and Disturbing Face
You have three routes. The easiest is a purchased mask or hood with burlap glued over it, cut away at the mouth. The middle option is a hood made from two yards of burlap draped over the frame’s top bar and hemmed at the shoulders. The advanced option is a paper mache or foam head built over a balloon form, which is where you control the sunken-cheek shape properly.
Whatever route you take, solve vision before you finish. Cut eye holes about 2 inches apart and back them with one layer of black pantyhose, which reads as a dark hollow socket while letting a smeared outline of the world through. A scrap of torn black mesh works too, and one builder on a costume forum disguised his own eye patches as a printed burlap sign so they did not look like mesh at all. Test the sightline indoors and on a stairwell before you go anywhere near a street.
Build the face with height, not detail. Sunken cheek hollows come from glueing two foam balls under the burlap and pulling the fabric into them. A wide mouth sewn shut with heavy dark thread, plus cross stitches on the cheeks, does more for the look than any amount of face paint. Keep stitching well away from the mouth opening, and never leave loose straw where a wearer breathes.
4. Add the Clothing and Rags
Dress the frame from the inside out. Put the trousers on first, add padding at the thighs and knees so the legs read as stuffed rather than empty, then slide the shirt over the shoulders and fasten only the middle two buttons so it hangs open and loose.
Now do the distressing. Cut slashes at the cuffs, hem and trouser legs, then pull the threads with your fingers or rub them against sandpaper until the hems are ragged and the shirt frays in panels. Stuffed shoulder pads or a ball of polyfill under the chest add the rounded, shapeless bulk of a field dummy.
The visible result at this stage: clothing that hangs away from the body in loose folds with torn openings you can slide straw into.
5. Make the Scary Details Look Authentic
Rope is the detail that separates a scary scarecrow costume from a farmer outfit. Tie jute around the neck, the waist, both wrists and both ankles, wrap each length twice, and finish with a rough knot on the outside. Those bindings read as the thing holding the whole figure together, which is exactly the impression you want.
Stuff the sleeves, the trouser legs, the collar and the hat brim with loose straw, leaving 2 inches sticking out of every opening. Add grime next: sponge tea and dirt mixed with a little dish soap onto the fabric, let it dry, then scrape the dried crust off in patches. That build-up and removal cycle gives a mottled, filthy surface no single coat of paint can imitate.
Push the look further with torn fabric patches, safety pins, cobwebs strung across one shoulder, and a crow or two perched on the arm. For a haunted house tier, add theatrical blood at the mouth and a stitched wound on the cheek. For a family trick-or-treating version, skip the blood entirely and use soot and cocoa powder mixed with glycerin instead.
6. Finish the Makeup and Final Fit
Makeup goes on in four layers. Start with a pale base so the skin reads as dead rather than tanned. Add grey or green shadows above the cheekbones and around the jaw with a soft sponge. Then draw the eye sockets: fill them with black paint, blend the edges outward, and smudge a little black over each eyelid so the eyes look hollow from ten feet away. Finish with dry brush, a little latex or theatrical blood at the mouth, and charcoal smudges on the forehead.
Do the whole makeup routine once before Halloween night and write down what you used. A five-minute version that still works under porch lights matters more than a perfect one-hour version that leaves you late.
7. Test the Costume Before Halloween Night
Wear everything for a full hour indoors before the night itself. Check four things: that you can see clearly enough to walk down stairs, that you can breathe without the straw and burlap trapping heat around your face, that no fastener or rope loop is pressing into a joint, and that nothing sharp is riding against your arms.
Walk ten minutes in the dark with a friend. Bulky costumes break in ways that only show up at the edge of a lit area, and a stiff shoulder bar will catch on door frames in ways you never notice at home.
Transport is the other test. Lay the frame across the back seat and the hat in the footwell. If you have a hat with a wire brim, flatten it carefully rather than folding it. Getting a stiff costume into a vehicle at 9pm in the rain is how a good scarecrow ends up ruined before trick-or-treating starts.
Common Mistakes
Almost every disappointing scarecrow traces back to one of these eight problems.
An unstable frame that shifts while you walk
Clamp and tape every joint, then brace the shoulder bar with two diagonal pipes. Test the frame over your clothes before distressing anything, so a re-cut costs you ten minutes instead of an evening.
Burlap scratching the wearer’s face
Line the inside of the hood or mask with a thin layer of liquid latex, or use a softer weave. Burlap that looks good on a table is often rigid, and a mask that looks fine on display can feel terrible after twenty minutes.
Straw ending up all over the house
Stuff less than you think and push it deep into the sleeves and legs. Tie the cuffs and ankles with rope to contain it, and skip loose straw near the face entirely. Shredded kraft paper or polyfill sheds far less if you are dressing a child.
Makeup that reads as flat and cartoonish
Blend, do not paint. Soften every black edge with a damp sponge, vary the tone across your face rather than using one flat colour, and test in dim light before the event. Photos taken in a lit room hide problems that appear under a porch bulb.
Restricted vision and poor depth perception
Cut eye holes with a margin around your real sightline, back them with a single thin layer of black pantyhose, and check the view from stairs in daylight. Never wear a costume you cannot navigate a kerb with.
Overheating
Stuffed clothing under a burlap hood traps heat fast. Plan a way to get the hat and hood off quickly, keep the hood unlined, and for kids under eight choose a mask-free version so they can take it off when they get hot.
The costume coming apart during wear
Glue every rope knot with a dot of fabric glue and use safety pins as backup at the shoulders and waist. Test sit-downs, because a costume that survives standing often fails the moment you sit on a porch step.
The hat sliding off
Add floral wire along the hat band and wrap it around your headband or hair. If the hat has no band, glue one on and let it cure fully before you wear it.
Frequently Asked Questions
How can I make a scary scarecrow costume at home?
Start with thrifted clothes: an oversized flannel shirt and baggy overalls. Fray the cuffs, hem and knees, stuff the sleeves and legs with straw, and tie jute rope at the neck, waist, wrists and ankles. Finish with a crushed straw hat and a burlap face with blackened eye sockets and a stitched mouth. A total of about four hours is realistic for the full version.
Do I need to build a frame to make a scarecrow costume?
No. Most people skip the frame entirely and use shoulder pads or loose polyfill under the shirt to create bulk. A PVC frame is worth it only if you want extra height, a slumped silhouette, or straw-filled arms that hold their shape. Try the no-frame version first and add structure only if the outfit looks flat.
What can I use instead of straw for a scarecrow costume?
Raffia, excelsior, shredded kraft paper, dried grass, and polyester polyfill all work. Polyfill and kraft paper shed far less, which matters in a car or on carpet, and they suit anyone with a hay allergy or a pet who will chew the strands. Avoid loose paper near the face, since it flakes.
How do I make my scarecrow costume scarier?
Height comes from three things: dark hollow eye sockets, rough rope bindings at every joint, and frayed fabric with straw poking out. Paint yourself pale with grey shadows on the cheeks and jaw rather than using one flat colour. A stitched mouth, soot smeared in layers, and one crow perched on the arm finish the illusion.
Can I make a scarecrow costume with no sewing and no hot glue?
Yes. Use fabric glue or double-sided tape on the burlap hood and hem, and tie the straw into place with short lengths of jute instead of gluing it. Skip the stuffed arms and build bulk with polyfill tucked inside the shirt. The result is less rigid and slightly less polished, which suits a casual haunted house night.
How do you see out from under a scarecrow mask or burlap hood?
Cut two eye holes about 2 inches apart and back them with a single layer of black pantyhose, which reads as a dark socket while still letting shapes pass through. Keep the holes clear of the burlap seam and check the sightline indoors and on stairs. A child should never wear a hood version that limits their view of traffic.
Conclusion
Start by standing in front of a mirror in the shirt and overalls and deciding your scare tier, because every later decision follows from that one choice. Test the fit on a bare frame before you distress a single hem, since re-cutting a frame in the dark is the one task nobody enjoys.
Once the structure holds, the scary parts go on fast: rope at the joints, straw at the openings, hollow black eyes, and a stitched mouth. Give it your own horror theme rather than copying a stock image, and the same thrift-store base reads as something you built rather than something you ordered. Update the checklist each July and you will have this ready well before the first trick-or-treater knocks.