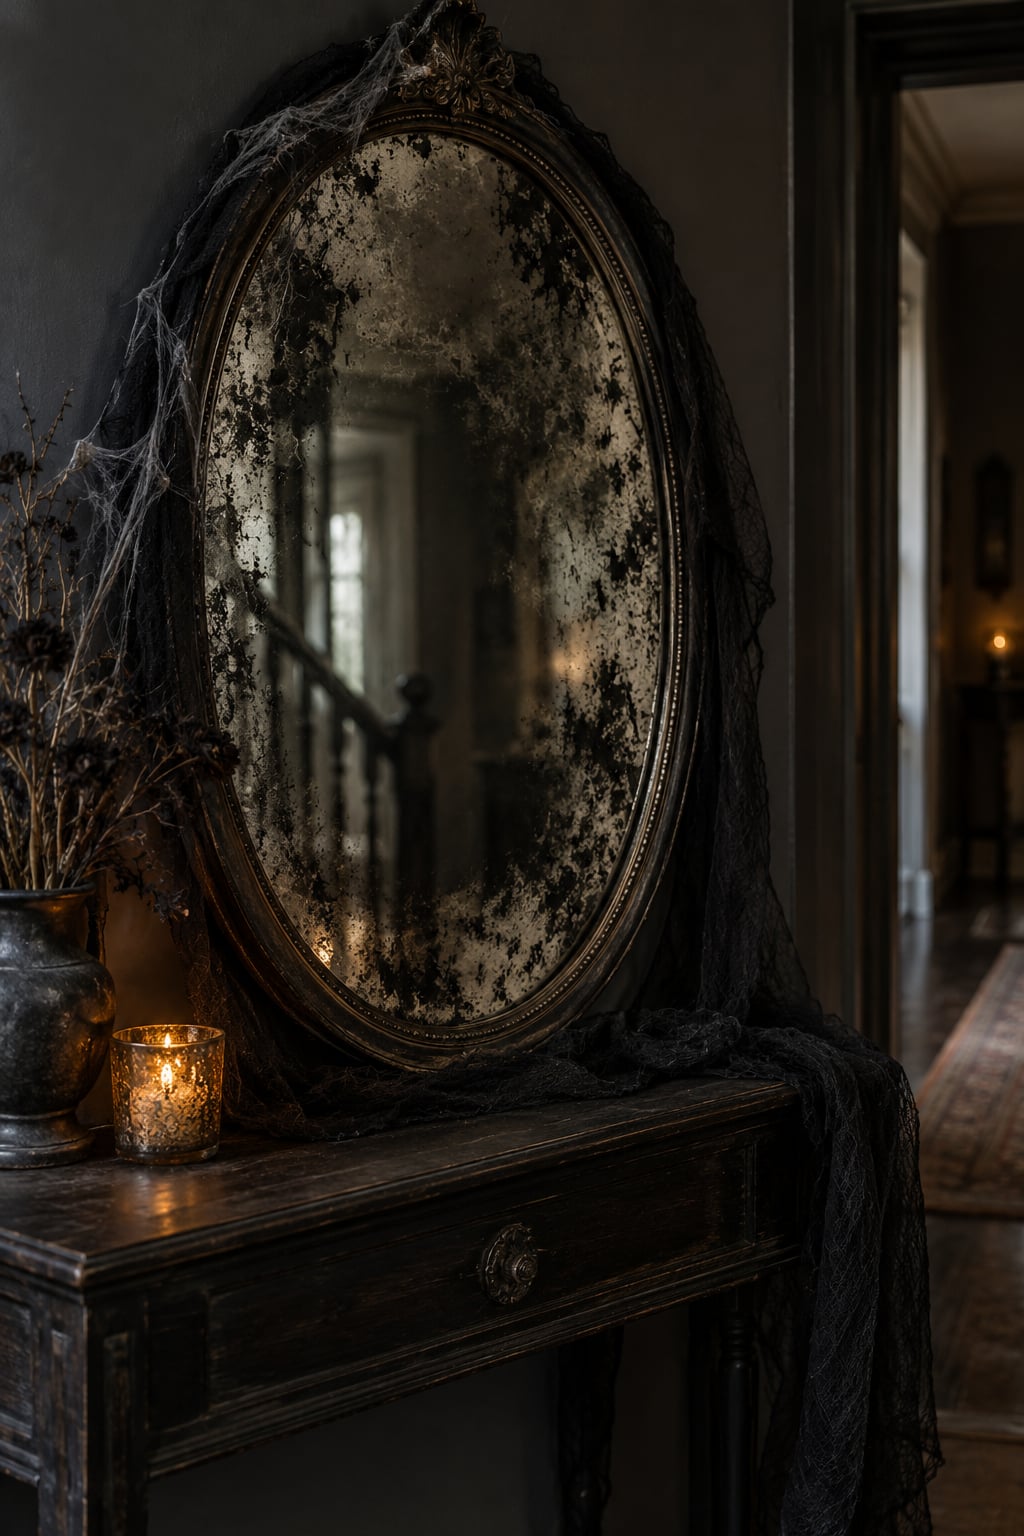
To make a haunted mirror effect at home, you change one thing about a normal mirror: either you age the glass so a face looks trapped behind it, or you hang a semi-transparent sheet over a lit screen so a ghost video appears to float inside the frame. The aged-glass route takes about an hour, costs almost nothing, and needs no power. The screen route looks far more dramatic and needs a dark room and a playing screen.
People call three different things a haunted mirror, and they are not interchangeable. The cracked decayed antique, the pale face peering out of foggy glass, and the floating hologram figure each need different supplies. Pick your look before you buy anything, because the materials barely overlap.
One safety note up front, since most tutorials bury it. Any aerosol paint or spray sealer goes on outdoors or in a garage with the door open, never in a small closed room, and you wear a mask. Read the can and follow what it says about ventilation and protective gear.
Table of Contents
- What You Need
- Step-by-Step: How to Make a Haunted Mirror Effect at Home
- Step 1: Prepare the Mirror and Choose the Haunted Look
- Step 2: Age the Mirror Surface
- Step 3: Add Cracks, Missing Pieces, or Distorted Details
- Step 4: Create the Face or Figure in the Mirror
- Step 5: Light the Haunted Mirror for Maximum Effect
- Step 6: Add Final Details and Test the Display
- Common Mistakes
- Frequently Asked Questions
- What materials can I use to make a haunted mirror effect at home?
- How do I make a haunted mirror effect without damaging the glass?
- Can I create a convincing haunted mirror without face paint?
- What lighting works best for a haunted mirror display?
- How do I make the face in a haunted mirror look realistic?
- Is it safe to leave a haunted mirror light on overnight?
- Conclusion
What You Need
For the aged-glass method, the essentials are a plain mirror, matte black spray paint, silver looking glass spray paint, distilled white vinegar, and a lint-free cloth for dabbing. That is five items and it is the whole core of the effect.
Everything else on the list is optional. A cheap picture frame makes the piece look deliberate rather than propped against a wall. Thin black paper or a vinyl crack decal sells the damage. A small brush and dark theatrical makeup handle smudges and stains without any paint at all. Cobweb material and a battery tealight add atmosphere once the base look is right.
For the screen variant you swap the paint for a two-way mirror or see-through mirror wrap, and you add a working screen playing a floating ghost clip on repeat. The frame has to be large enough to hide the screen edges completely, or the illusion dies the second someone looks at it.
A few substitutions worth knowing. Dollar store frames are fine and nobody can tell. Thrift stores and marketplace listings are where old screens come from, and a working set you no longer want is a perfectly good display screen. For the paint, hardware stores stock looking glass spray paint at a noticeably lower price than craft chains, and readers who switched stores for that reason say it made the whole project cheaper.
You can skip paint entirely. Take a cheap mirror apart, lightly scratch the reflective backing with a razor until the image shows through in patches, then reassemble it. Slower and less controlled, but it costs pocket change and it works in an apartment.
Step-by-Step: How to Make a Haunted Mirror Effect at Home
The version below builds the aged portrait mirror, the one that keeps working after Halloween because it needs nothing plugged in. Each step tells you what a finished stage should look like, so you know whether to move on.
Step 1: Prepare the Mirror and Choose the Haunted Look
Clean the glass with glass cleaner and a lint-free cloth, then let it dry fully. Tape the edges with painter’s tape if you will be spraying, and lay a drop cloth down first.
Choose your style before you touch anything else. A cracked look wants clear vinyl crack decals and thin black lines radiating from one corner. A decaying look wants blotchy black and gray over the surface. A ghostly look wants fog and a pale face. A partially missing look wants torn paper over the border. Mixing styles is the fastest way to end up with a muddled prop.
Success at this stage is simple: clean glass and a chosen style. If the mirror still has smears, the paint will bond unevenly and the whole build fails at step two.
Step 2: Age the Mirror Surface
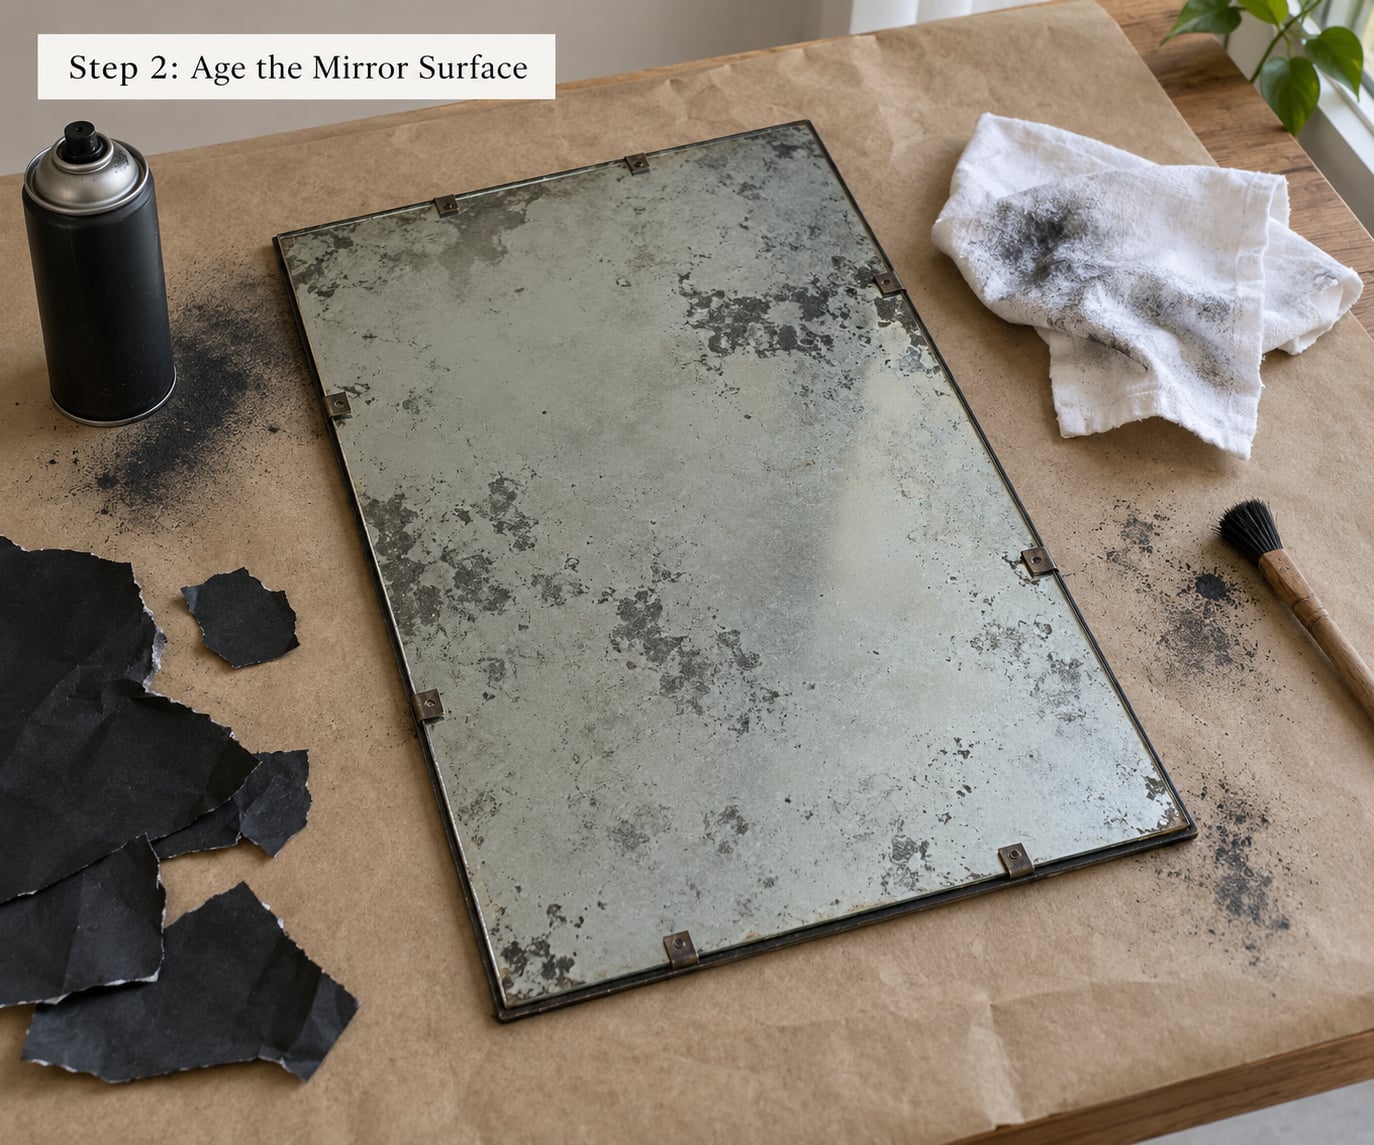
Flip the mirror face down onto a protected surface. Spray the back of the glass with matte black paint in thin, even coats, keeping the can moving. Two or three light coats beat one heavy coat, because a thick layer in the middle is the single most common way this project fails.
While the black is still tacky, mist the back lightly with distilled white vinegar. Then spray a thin coat of silver looking glass paint over the top. The vinegar is what breaks up the reflective layer and creates the mottled antique patina when you dab it away.
Lightly dab the wet surface with a lint-free cloth, working in small patches. Too early and you strip the reflective coating back to bare black. Too late and the finish comes out spotty. Expect to need three, four, maybe five passes on sections before one patch looks right.
You know it worked when the back looks cloudy and uneven, with soft gray patches instead of a clean silver sheet. If it looks like a brand new mirror, keep dabbing. If it looks like solid black with no silver, you went too far and should clean the glass and start again.
Step 3: Add Cracks, Missing Pieces, or Distorted Details
For cracks, use a clear vinyl crack decal or draw thin black lines with a fine marker or paint pen. Lines that start at an edge and branch outward read as impact damage. Lines that cross the middle read as sloppy, so keep them directional.
For a partially missing look, lay torn black paper or a torn print over the border of the glass. Torn edges beat straight cuts every time. Leave the center clear, because that is where the face goes and you want it visible.
Skip real broken glass. It looks sharp, it cuts people, and it throws light in ways that break the mood. A brown paper bag sheet or printed glass-crack graphic does the same job with no risk.
Step 4: Create the Face or Figure in the Mirror
Tape a printed portrait face down to the back of the glass before you dab the final patches, so the patina forms over it rather than under it. A straight-on stare reads as unsettling. A face angled slightly to one side reads as watching someone.
For a painted face instead of a print, use white face makeup as the base, then hollow out the eyes with black or deep purple shadow and leave the mouth pale. Smudge the edges outward with a sponge so the boundary disappears into the glass.
A silhouette works well when you do not want a face. Black clothing, a dark wig, a pale hand, or a shrouded figure pressed close to the back of the glass all read as a presence.
Then test from several distances. Stand at arm’s length, then across the room, then in the doorway where guests will first see it. If the face reads instantly from three meters, it will read instantly at two. Move the figure closer to the glass to make it larger, or back for a fainter, more distant look.
Step 5: Light the Haunted Mirror for Maximum Effect
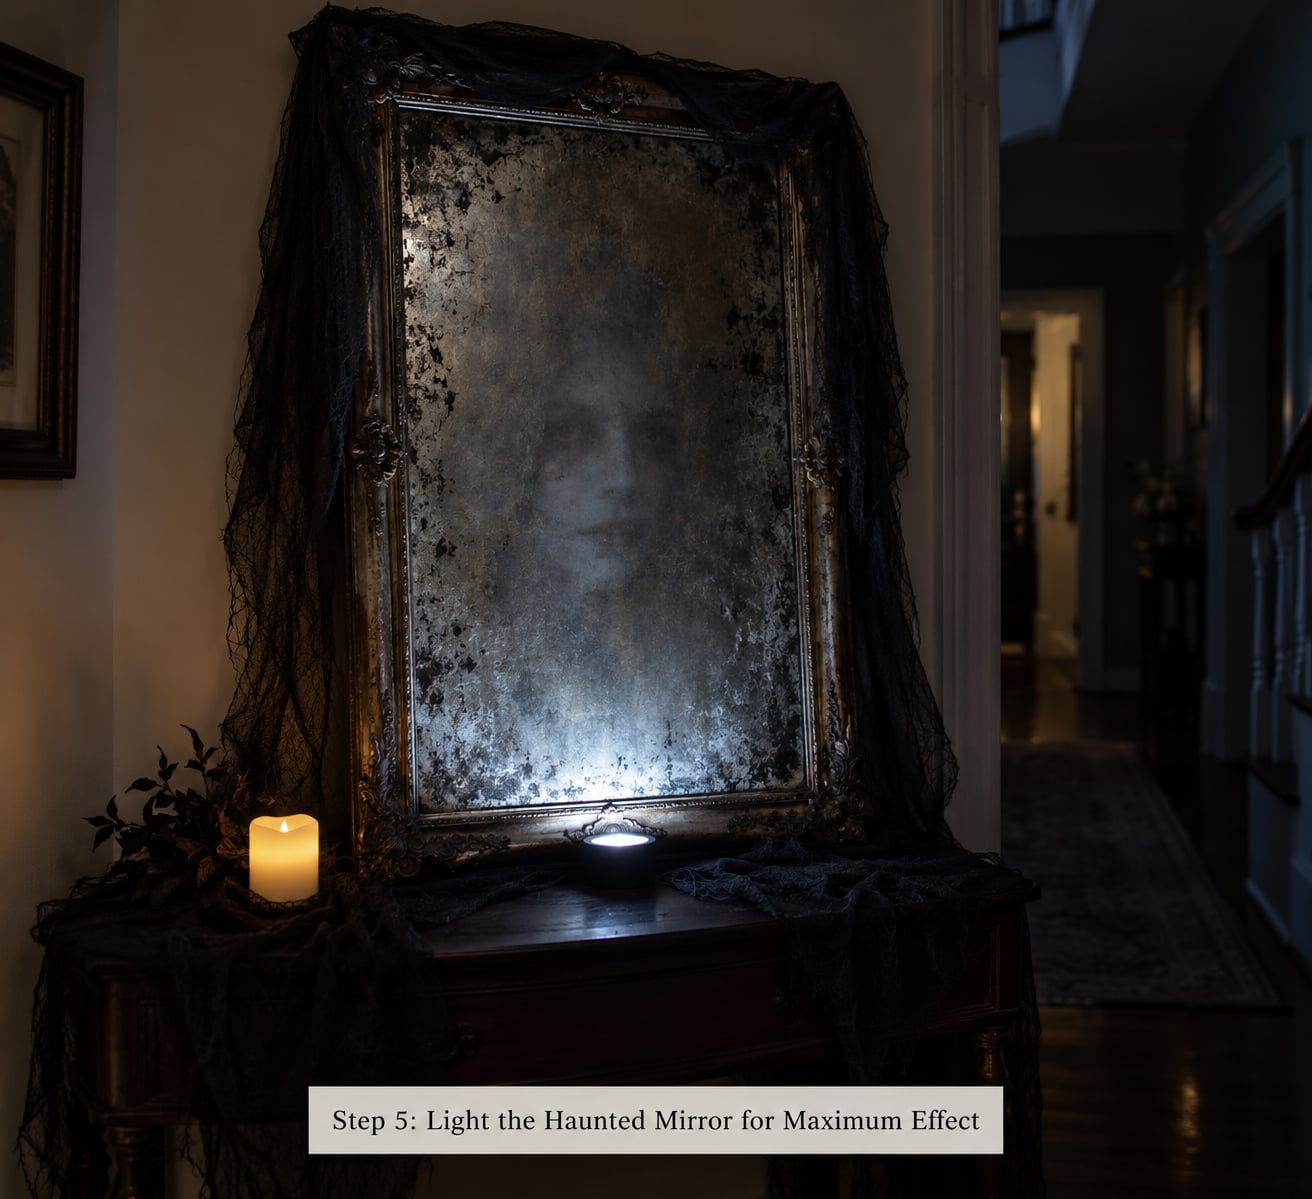
Low, cool light from one direction works best. A single LED spotlight aimed up from below the frame or a small colored light placed off to one side creates depth and lets the aged surface read as uneven.
If you built the screen version instead, the principle is the same but stricter. A two-way mirror is partly reflective and partly see-through. When the room behind you is dark and the screen behind the mirror is bright, the screen’s light passes through while the room stays dark, so you see only the ghost clip. With the room lights on, you see a plain mirror and nothing else. With the screen off, you see an empty dark panel. Both conditions are absolute, not matters of degree.
Keep lights and cords clear of walking paths, use battery-powered lights where you can, and never run a cord under a rug. Do not stare at bright LEDs from close range, and keep any spot fixture well away from fabric draping. Follow the manual on whatever light you buy.
One LED strip behind the glass turns a thick coat of looking glass paint into a Haunted Mansion-style floating figure, which is the easiest upgrade in this whole list.
Step 6: Add Final Details and Test the Display
Optional extras sell the story: stretched cobweb material in the corners, a strip of masking tape reading DO NOT DISTURB, a scattering of artificial dust or glitter, and a hidden speaker playing a low drone or creak loop.
Hang the finished mirror where the light hits it but people do not walk into it. A hallway wall or the side of a doorway works better than a spot over a stair landing. If the piece is heavy, use two eye hooks and a level rather than a single adhesive strip.
Stand back and time your own reaction. If you notice the cobwebs first, pull them down. If you notice the aging first, deepen the patina. A good haunted mirror takes a beat to read, which is exactly the feeling you want.
That is the full process for how to make a haunted mirror effect at home: clean glass, layered patina, one strong damage detail, a well-positioned figure, and lighting that only comes from one side. Every step is reversible until step two, and even a botched coat can come off with glass cleaner.
Common Mistakes
The center looks like a solid black blob. You sprayed too thick. Rub the middle back with a lint-free cloth while the black is still slightly damp, then lay a fresh thin coat over it. This is the mistake the most experienced builders make on their first attempt.
The patina is spotty or uneven. You dabbed too early and stripped the reflective coating, or too late and the vinegar never broke it up. Keep dabbing in small circles on the patchy areas. If a whole section is dead, clean the glass and redo that section rather than the entire mirror.
The whole thing just looks flat. One even light source kills the effect. Move to a single light, place it below or to one side, and let the surface texture catch it unevenly.
The face or video is invisible. Glare, a bright room, or a figure sitting too far behind the glass. Kill ambient light, darken whatever is behind you, and press the image closer to the surface.
The screen version shows a normal mirror. The room lights are on. Turn them off, close the door, and play the clip full screen.
The screen is visible around the edge. The frame does not hide it. A frame can be a little wider than the screen but never narrower than it.
You damaged the glass trying to distress it. Razor work on the reflective backing scratches permanently. Stop, switch to the layered paint method, and reuse any mirror whose back still cleans up with glass cleaner.
You added too much. Cobwebs, decals, dust, and a fog machine together turn a creepy prop into a mess. Choose one aging detail, one damage detail, one figure, one light. Fewer things land harder.
Whatever you build, keep it away from heat sources, leave the sprayer caps off and the can out in a safe place, and unplug anything mains-powered when you are done for the night.
Frequently Asked Questions
What materials can I use to make a haunted mirror effect at home?
For the aged look you need a plain mirror, matte black spray paint, silver looking glass spray paint, distilled white vinegar, and a lint-free cloth. Optional extras are a picture frame, thin black paper or a vinyl crack decal, theatrical makeup, and cobweb material. For the hologram look you swap the paint for a two-way mirror sheet or see-through mirror wrap plus a working screen.
How do I make a haunted mirror effect without damaging the glass?
Never work on the front of the glass. Flip the mirror face down, tape the edges, and build every layer on the back, so the reflective coating stays intact. Skip razor scratching on the reflective side too, because those scratches do not come out. If a coat goes wrong, glass cleaner removes it and the glass stays reusable.
Can I create a convincing haunted mirror without face paint?
Yes. Print a black and white portrait and tape it to the back of the glass before you dab the final patina patches, so the aging layers form over it. A silhouette in dark clothing pressed close to the back works too, and reads as more unsettling than a printed face. You can also scratch the backing of a cheap mirror with a razor instead of using paint at all.
What lighting works best for a haunted mirror display?
One low, cool light from a single direction. A small LED spotlight aimed up from below the frame, or an LED strip behind the glass with a thicker reflective coat, creates depth and lets the aged texture read as uneven. Avoid overhead room lighting, which flattens the surface and kills the effect completely. Battery-powered lights are the safest option for a display.
How do I make the face in a haunted mirror look realistic?
Work in layers and keep the edges soft. Start with white face makeup, hollow the eyes with black or deep purple shadow, smudge outward with a sponge, and leave the mouth pale and undefined. A straight-on stare reads as menacing; an angle to one side reads as watching. Test from several distances and move the figure closer to the glass when it looks too faint.
Is it safe to leave a haunted mirror light on overnight?
Only if the light is battery-powered or rated for continuous use. Unplug any mains-powered spotlight or LED strip when you are finished for the night, and keep cords out of walkways and away from fabric draping. Never leave a heat-generating lamp resting against the mirror or its frame, and never look into a bright LED from close range.
Conclusion
Start with the mirror itself. Clean it, age the back with the black, vinegar and looking glass layers, add one strong damage detail, then position the face or figure close to the glass and light it from a single low source.
That is how to make a haunted mirror effect at home with nothing more exotic than a can of paint and about an hour. Adjust the scale to whatever space you have, and if the patina fights you, remember that three thin coats beat one thick one every time.