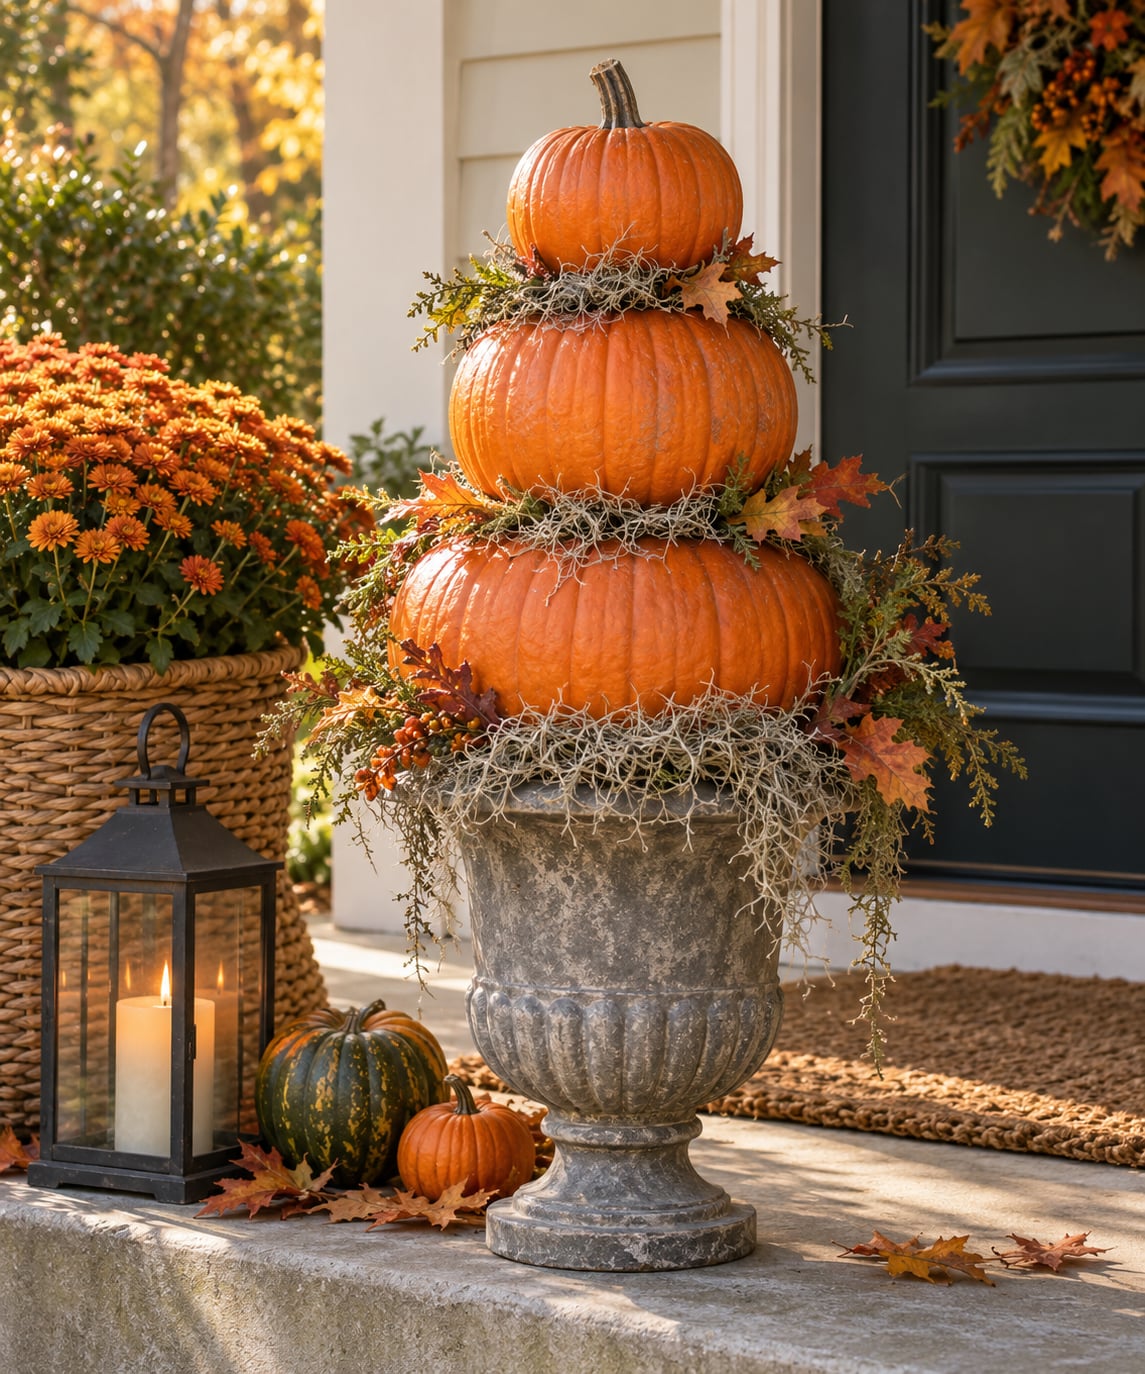
A pumpkin topiary is three pumpkins stacked biggest to smallest on a rigid vertical support and anchored in a weighted planter or urn. To make a pumpkin topiary for your porch, choose graduated faux pumpkins, thread them onto a dowel rod, lock the base down with stones or soil, then tuck fall foliage into the gaps. The whole build takes 45 to 60 minutes once the parts are in front of you.
Difficulty is low, as long as you pick pumpkins that actually nest. Most beginner failures come down to two things: glue that peels off plastic, and a base light enough for one gust to send it across the walkway. Both have easy fixes, and I will get to them below.
Table of Contents
- What You Need
- Pumpkins
- Support and base
- Tools
- Accents and lighting
- Step-by-Step: How to Make a Pumpkin Topiary for Your Porch
- Choose the Pumpkin Arrangement
- Build a Stable Base
- Stack and Secure the Pumpkins
- Add Foliage and Finishing Touches
- Place and Light the Topiary
- Common Mistakes
- Frequently Asked Questions
- What materials do I need to make a pumpkin topiary?
- Do I need to carve the pumpkins for a porch topiary?
- How do I keep a stacked pumpkin topiary from tipping over?
- How long will a pumpkin topiary last on a porch?
- Can I make a pumpkin topiary in a pot instead?
- What can I use to decorate a pumpkin topiary besides fresh leaves?
What You Need
You need three graduated pumpkins, one vertical support, one heavy base and a handful of fall accents. Nothing exotic, but the parts have to match: the stack only holds together when each pumpkin sits flat in the dip of the one below it.
Pumpkins
- One large pumpkin, roughly 12 to 16 inches across, for the base
- One medium pumpkin, roughly 8 to 10 inches, that settles into the dip of the base
- One small pumpkin, roughly 4 to 6 inches, to cap the stack
Faux pumpkins are the better default for a porch. They keep their shape, they take spray paint well, and they come back out of storage every fall. Real pumpkins work for a two or three week window, and I would not put them up more than a couple of weeks before Halloween.
Aim for a gradual size drop rather than three similar pumpkins. If the medium one is nearly as wide as the base, nothing sits level and the whole thing leans.
Support and base
- A 3/4 inch wooden dowel rod, about 30 inches long. A bamboo stake or a short length of 1 inch PVC pipe works the same way
- A planter, urn or heavy pot at least 2 inches wider than the base pumpkin
- 4 to 6 pounds of stones, sand or bagged soil to weight the base
The weight matters as much as the glue. A topiary with a light base is the one thing that reliably ends up in the yard.
Tools
- A hot glue gun with high-temperature glue sticks
- A construction adhesive such as E6000 for the plastic itself. Regular craft glue and plain hot glue often let go of a slick plastic pumpkin
- A drill with a hole saw bit to cut through the stems. If you do not own one, a sharp paring knife and a steady hand do the same job
- A miter box or hand saw to cut the dowel to length
- Painter’s tape and an outdoor-safe spray paint if you are recoloring cheap pumpkins
Accents and lighting
Faux fall leaves, Spanish moss, a grapevine ball, burlap or buffalo-check ribbon, dried seed heads, faux sunflowers and a few mums all work. For lighting, wrap one battery-operated warm-white string strand around the stack. Skip anything with a cord you have to run across the walkway.
Step-by-Step: How to Make a Pumpkin Topiary for Your Porch
Work from the bottom up and assemble the whole stack in the planter before you carry it anywhere. Carrying a finished topiary by the top pumpkin is how people end up on the porch floor with a cracked plastic shell.
Choose the Pumpkin Arrangement
Three graduated pumpkins, largest at the bottom, give the version most porches need. Set your large pumpkin on the floor and lay the medium one in its top dip, then the small one on top, and you can see immediately whether they nest. If the medium pumpkin rocks or hangs over more than about a third of its own width, swap it for a smaller one.
For a narrow porch or a small step, build a two-pumpkin version instead. A wide base pumpkin with a single smaller pumpkin on top reads just as clearly from the street and it will not sway.
Check every stem before you cut anything. Stems should be attached, reasonably straight and free of deep cracks, because each one has to carry the weight of everything above it.
Build a Stable Base
Anchor the bottom pumpkin in something heavy and slightly wider than the pumpkin itself. An urn or planter filled with stones or packed soil is the simplest version, and it doubles as the planter you might want mums in later.
Pour the weight in first, then nest the base pumpkin into it so roughly a quarter of its body sits below the surface. That sunk portion is what stops it rolling on an uneven porch board.
Protect the surface underneath. A shallow tray, a piece of rubber mat or a thick bed of leaves under the planter keeps moisture off the wood and keeps the whole thing from creeping when the wind comes up off the yard.
Stack and Secure the Pumpkins
Run one vertical support through the center of all three pumpkins, and use a dab of adhesive at each joint. Cut the dowel about 4 inches shorter than your total stack height so the top of it stays hidden inside the small pumpkin.
Drill straight down through the stem of the medium pumpkin and out the bottom, then do the same for the small one. If you are working without a drill, a sharp paring knife opens the same hole more slowly, so support the pumpkin from underneath as you work.
Slide each pumpkin onto the dowel from the top down, largest first, and add a small ring of construction adhesive around the stem where it meets the pumpkin below. Wipe the squeeze-out with a damp cloth before it cures.
Then stop and look at it from the side. If the stack leans, shift the top pumpkin until the center of gravity sits directly over the base, and re-seat the medium one rather than shimming the lean with foliage.
Add Foliage and Finishing Touches
Tuck fall accents into the gaps between pumpkins and around the base, keeping the stem joints visible. Spanish moss hides the seam where the medium pumpkin sits, and a grapevine ball or a few faux sunflowers at the base gives the arrangement weight where it needs it.
A burlap or buffalo-check bow tied around the base pumpkin softens the hardest line in the stack, which is the flat shoulder where one pumpkin meets the next.
Decorate the topiary close to when you will put it outside. Fresh moss, live mums and soft foliage look great for about a week and then wilt, and a wilting accent drags the whole arrangement down with it.
Place and Light the Topiary
Set the finished topiary where it reads from the street, usually flanking the front door or at the top of the porch steps, and never in the path people walk. Against a railing or a wall of the house is steadier than the open end of a porch.
Give the base a final push in a few directions. If it moves more than about an inch, add more weight before you decorate it further.
Add the warm-white light strand in the evening when you are done, and wrap it loosely so no bulb touches a pumpkin stem directly. Battery strands are what I use because they leave no cord to trip over and no outlet to argue with.
Common Mistakes
- Pumpkins that do not match in size. When the middle pumpkin is nearly as wide as the base, nothing sits level. Match the drop between tiers before you cut a single hole.
- Stacking too high. Three pumpkins is the practical limit for a porch. A fourth adds sway without adding much, and topiary is a shape, not a tower contest.
- Leaving stems pointing outward. Rotate each pumpkin so the stem points up and inward. A stem jutting at eye level is something people walk into.
- Decorating weeks early. Fresh moss, mums and soft foliage wilt long before Halloween. Add perishable accents in the last week.
- Placing it in the walkway. A topiary beside a door is atmosphere. A topiary at the bottom of the steps is an obstacle. Keep the walking line clear.
- Trusting plain hot glue on plastic. Slick plastic surfaces shed ordinary glue and standard hot glue sticks. Use a construction adhesive for plastic and let it cure fully before the stack goes outside.
- Skipping the weight in the base. This is the number one reason porch topiaries end up in the yard. Stones or packed soil in the bottom planter solve it.
Frequently Asked Questions
What materials do I need to make a pumpkin topiary?
Three graduated faux pumpkins, a 3/4 inch dowel rod about 30 inches long, a planter or urn wider than the base pumpkin, 4 to 6 pounds of stones or soil to weight it, and fall accents such as faux leaves and Spanish moss. Add a hot glue gun, a construction adhesive that bonds to plastic, and either a drill with a hole saw bit or a sharp paring knife for the stem holes.
Do I need to carve the pumpkins for a porch topiary?
No. A stacked topiary is meant to be read from the street, and carving removes the surface that has to sit flat on the pumpkin below. Leave the shells solid and paint a face on instead of cutting one. Some decorators carve a pumpkin pail used as the base, but the pumpkins inside the stack stay uncarved so the tiers sit flat.
How do I keep a stacked pumpkin topiary from tipping over?
Weight is the fix. Fill the base planter with stones, sand or packed soil so the arrangement is heavy at the bottom, and set a tray or mat under it so the base pumpkin cannot roll. Keep the stack to three pumpkins, keep the dowel vertical, and place the display against a railing or wall rather than at the open end of the porch.
How long will a pumpkin topiary last on a porch?
A faux pumpkin topiary lasts as long as you leave it out, and many decorators bring the same one back every fall. Real pumpkins are a different story: expect two to three weeks outdoors before the skin dulls, the stem softens and squirrels arrive. Paint real ones with an outdoor primer and move the display indoors as soon as it starts to go.
Can I make a pumpkin topiary in a pot instead?
Yes, as long as the pot is heavy enough and wide enough for the base pumpkin to overhang without tipping it. Terracotta, cast concrete and glazed ceramic urns all beat lightweight plastic. A wide shallow pot suits the compact two-pumpkin version, and filling the pot with soil rather than stones gives you a place to tuck in real mums.
What can I use to decorate a pumpkin topiary besides fresh leaves?
Grapevine balls, Spanish moss, dried seed heads, faux sunflowers, burlap or buffalo-check ribbon, small gourds and late mums all work. Anything staying outside should be faux or dried, because fresh material wilts within days. A battery-operated warm-white light strand wrapped loosely around the stack handles the evening display.
Start with the base. Pick your three graduated pumpkins, weight the planter, and everything after that goes quickly. That is the whole project: a pumpkin topiary for your porch is not a complicated build, it is a bottom-heavy stack that you made stable before you made it pretty.
When the season ends, pull the foliage, lift the pumpkins off the dowel and store the pieces flat in a bin. Built that way, the topiary comes back out next fall and you only rebuild it in a couple of minutes.