Eyeball cake balls are baked cake crumbled to fine crumbs, bound with just enough frosting to hold, rolled into small balls, chilled, coated in melted white chocolate, and finished with a red iris and black pupil. Learning how to make eyeball cake balls takes about 45 minutes of active work plus chilling time, and the result is a Halloween party treat that looks gory and tastes like a soft, fudgy truffle.
They are the easiest thing on my Halloween table because almost everything can be done a day ahead. I bake on a Sunday, roll and dip on Monday, decorate Tuesday morning, and the tray is still perfect Wednesday night.
Updated for 2026.
Table of Contents
- What You Need
- Step-by-Step: How to Make Eyeball Cake Balls
- 1. Bake and Cool the Chocolate Cake
- 2. Make the Cake Mixture
- 3. Shape the Cake Balls
- 4. Add the Eyeball Details
- 5. Chill Before Serving
- Common Mistakes
- Frequently Asked Questions
- How long do eyeball cake balls need to chill before serving?
- Can I make eyeball cake balls ahead of time?
- What can I use instead of candy eyes?
- Why are my cake balls falling apart?
- Do I need to refrigerate eyeball cake balls with cream cheese frosting?
- Can I use a box cake mix for eyeball cake balls?
- Conclusion
What You Need
This base recipe makes about 24 eyeballs. Start with a standard 9 by 13 inch chocolate cake or one box of chocolate cake mix baked according to its own directions.
- 1 box chocolate cake mix or from-scratch chocolate cake baked and completely cooled
- 1 cup frosting for binding, usually vanilla buttercream or a standard tub frosting
- 10 to 12 ounces white chocolate or candy melts for the coating
- Red candy melts, a red Skittle, or a Life Saver for the iris
- Black gel decorating tube or black edible marker for the pupil
- Optional: red gel tube for blood vessels, white gel tube for the catchlight, mini M&Ms, lollipop sticks for a pop version
The binder is where most recipes go vague, so use measurements instead of guessing. Three cups of loose crumbs usually want between three quarters of a cup and one full cup of frosting. Add it a quarter cup at a time and stop when the mixture holds together when you squeeze it.
Canned pure pumpkin works as the binder too, and it gives a stiffer dough that is far easier to roll. Marshmallow fluff is stickier but keeps the balls softer for weeks, and nut butter adds a peanut-butter flavor for kids who are allowed to have one.
A few tool notes. You want a parchment-lined baking sheet, a small cookie scoop or tablespoon, a microwave-safe bowl, a toothpick, and a fork or lollipop stick for dipping. A cooling rack saves you from steaming the cake in its pan while it cools.
On candy eyes: check the label. Most packaged candy eyes and novelty sprinkles are fine at parties but are not labeled for school or for under-three guests, so use the gel tube and piping method instead for small children.
Step-by-Step: How to Make Eyeball Cake Balls
1. Bake and Cool the Chocolate Cake
Bake your cake mix or from-scratch cake and let it cool in the pan for 10 minutes, then turn it onto a rack. You need it room temperature all the way through before you touch it, which usually takes 90 minutes.
Warm cake smears into paste instead of crumbs. To get a smoother mixture, break the cake into pieces with your fingers and blitz it in a food processor for 20 seconds, or just work the pieces between your hands until no large chunks remain.
Scrape off any frosting or icing that set in hardened clumps on top of the cake. Those hard bits do not crumble and they end up as lumps in the finished ball.
2. Make the Cake Mixture
Put the cooled cake in a large bowl and add three quarters cup of frosting. Work it through with your hands or a spatula until no dry pockets of crumb remain, then squeeze a handful.
The right texture holds its shape when squeezed but still breaks apart with a gentle thumb press. Too dry and the balls crumble in your palm; too wet and they flatten on the tray. Add frosting in small increments, never more than a quarter cup at a time.
If you overshot and the mixture is sticky, chill it for 20 minutes, then knead in a tablespoon of crumbs from the reserved cake pieces until it firms back up.
3. Shape the Cake Balls
Use a small cookie scoop or a tablespoon to portion the mixture. Roll each piece between your palms with firm, quick circular motions until it is smooth and round.
Rolling fast on a chilled surface matters more than pressure. A sticky mat or a chilled marble slab keeps the bottoms from smearing, and if your hands get tacky, dust them lightly with confectioners sugar.
Set them on a parchment-lined tray about half an inch apart and chill for at least 30 minutes, or freeze for 20. Balls that have been through a freezer hold together much better in the melted coating.
4. Add the Eyeball Details
Melt 10 to 12 ounces of white chocolate or candy melts in a microwave-safe bowl, heating in 30-second bursts at 50 percent power and stirring between each one. Stop as soon as it is smooth and pourable, then let it sit two minutes so it is warm rather than hot.
Dip each cold ball with a fork or lollipop stick and let the excess drip off for a few seconds. Roll the fork gently against the edge of the bowl to knock off loose strands, then place on the parchment tray. Do not stir the ball around in the melted chocolate, since that is what pulls loose crumbs into the coating.
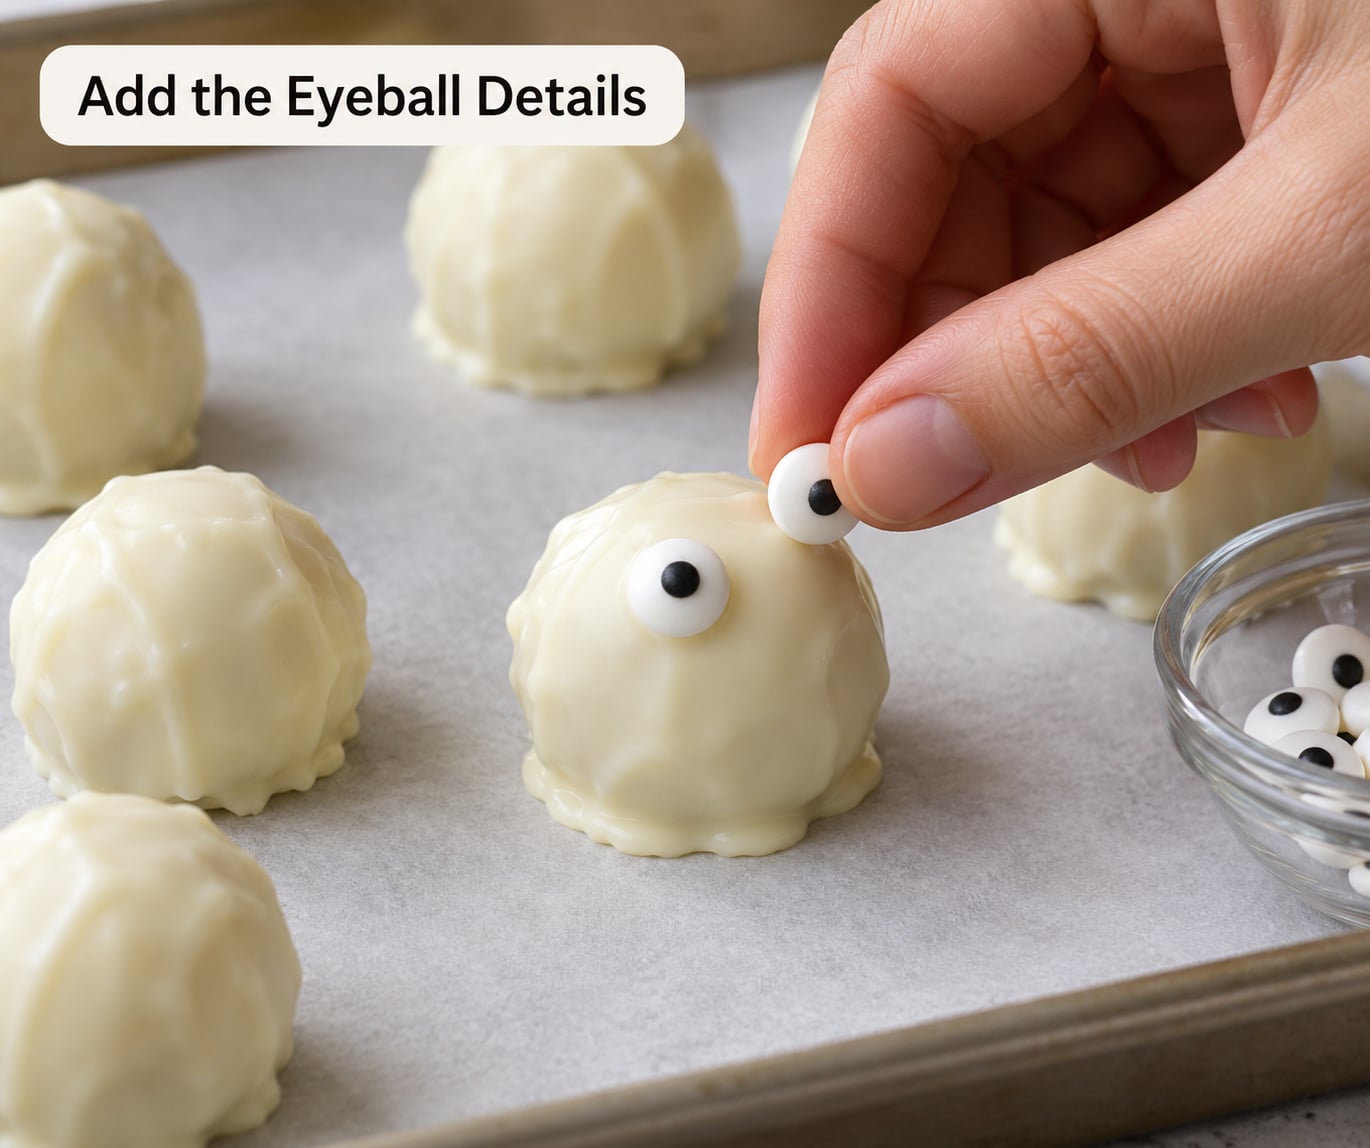
Let the coating set for 15 to 20 minutes, then decorate. Place a red candy melt, a red Skittle, or a Life Saver flat in the center of each ball and press it down with one fingertip for a couple of seconds so the chocolate grips it.
Add the pupil with a black gel decorating tube while the coating is still slightly soft, or use a black edible marker if the shell has fully hardened. A single dot of white gel on the pupil is the detail that makes the whole batch look like eyes rather than tomatoes.
For a bloodshot version, run thin red lines from the outer edge of the iris outward. Skip that step for a classroom or a kids party and you get a friendly, no-gore eyeball that still reads as an eye.
If you want cake pops instead, push a lollipop stick into the bottom half of the ball, stopping near the center, then stand the sticks in a block of foam so the eye faces upward while they set. One block of floral foam does the job as well as any stand sold for this.
5. Chill Before Serving
The decorated balls need about 30 minutes in the refrigerator so the coating and the iris fully harden before anything touches them. Serve them cold, straight from the fridge, on a platter lined with black or orange parchment.
How to make eyeball cake balls that survive a two-day wait: store them in an airtight container in the fridge, not on a plate. Expect about five to seven days refrigerated, which covers most parties, and use the freezer for anything beyond that.
Frozen eyeballs keep around three months in an airtight container. Thaw them in the fridge for a couple of hours rather than on the counter, and if condensation forms on the coating, blot it off gently with a paper towel.
They travel well, which is not true of most frosted desserts. Keep them in a container with parchment between layers, hold the container level in the car, and skip the freezer if they need to warm up for the dessert table.
Common Mistakes
Balls falling apart in the melted chocolate. They were not cold enough or the mixture was too dry. Chill or freeze the balls a second time for 15 minutes, and squeeze-test a spare piece before dipping. You want it dense enough to survive the fork.
Mixture too sticky to roll. Too much frosting went in. Chill the dough for 20 minutes and knead in a spoonful of reserved crumbs. Chilling alone fixes it more often than adding anything else.
Lumpy, misshapen balls. Crumbs were left too large, or the dough was rolled too slowly. Blitz the cake a little finer and use fast circular motions with clean, dry hands.
Loose crumbs floating in the coating. Do not stir the ball around in the melt. Dip straight down, lift straight up, and tap the fork once against the rim.
Coating that cracks when you bite it. It was too thick. Stir in melted coconut oil or vegetable oil a teaspoon at a time until it ribbons off the spoon, and thaw the balls out if they came straight from the freezer.
Candy eyes pressed flat or a smeared pupil. Push with one fingertip and count to three instead of holding pressure. Wait until the shell loses its wet shine before adding a black pupil.
Decorating while the chocolate is warm. Melted coating needs to look matte, not glossy, before you add an iris. Decorating too early is why finished eyeballs end up plain white.
Melted chocolate turning grainy. Water got in the bowl. Let it cool, pour it into a fresh bowl, and restart rather than trying to rescue it.
Skipping the freezer and wondering why decorating is hard. Make your decorating the night before and refrigerate the tray overnight. You will have a calm hour instead of a rushed one.
Frequently Asked Questions
How long do eyeball cake balls need to chill before serving?
Give coated eyeball cake balls 30 minutes in the refrigerator, or about 15 to 20 minutes at room temperature, before you add the iris and pupil. Chilling before dipping is separate and matters more: freeze the rolled balls for 20 minutes or chill them 30 minutes so they hold together in the melted chocolate.
Can I make eyeball cake balls ahead of time?
Yes, and they are better for it. Roll and dip up to two days ahead, refrigerate in an airtight container, and add the iris and pupil within a few hours of serving. Covered eyeballs keep about five to seven days refrigerated and roughly three months frozen.
What can I use instead of candy eyes?
Any flat, round candy about half an inch wide works as the iris: red Skittles, Life Savers, mini Mu0026amp;Ms, or red candy melts melted and dropped onto a silicone mat. For a younger crowd, pipe a red iris and black pupil onto the set coating with gel decorating tubes instead of using novelty candy.
Why are my cake balls falling apart?
Two causes account for almost all of them. The mixture is too dry, which means more frosting or a firmer squeeze, or the balls went into the melted chocolate warm instead of cold. Chill or freeze them for 20 minutes and test one before you dip the rest.
Do I need to refrigerate eyeball cake balls with cream cheese frosting?
Refrigeration is the safer choice for cream cheese frosting, and for white chocolate coatings in a warm room, since both soften quickly. Cool white chocolate with a shelf-stable frosting can sit out for about two hours on a party table, which is roughly how long most parties run.
Can I use a box cake mix for eyeball cake balls?
Yes. A box mix is the fastest route and the most forgiving. Bake one box of chocolate cake, cool it fully, crumble it, and start with three quarters cup of frosting, adding more only until a squeezed handful holds its shape. One box makes roughly 24 eyeballs.
Conclusion
Start with a fully cooled cake. Crumble it fine, add frosting a quarter cup at a time until a squeezed handful holds, then roll and chill the balls before they ever touch melted chocolate. Decorate once the coating turns matte, refrigerate for 30 minutes, and your eyeball cake balls are done.
Once you have the method down, the same base works for red velvet, lemon, funfetti, or a nut butter binder, so you can make a second tray in a different color without changing anything about the technique.