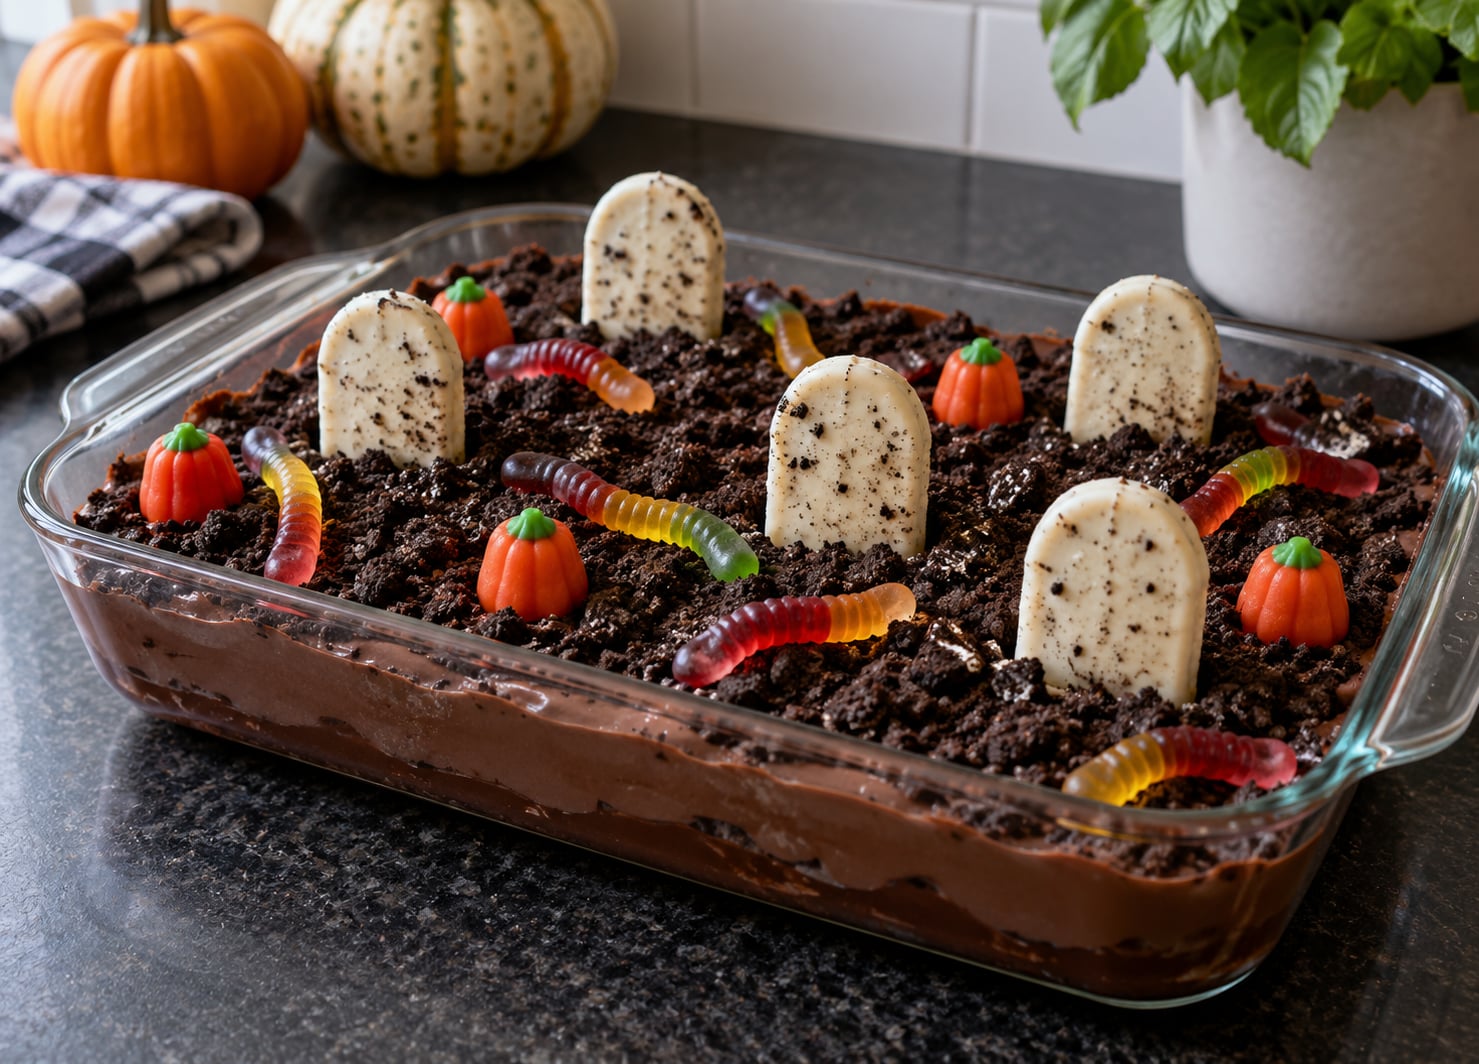
A graveyard dirt cake is a no-bake Halloween dessert built from layers of chocolate pudding and crushed chocolate sandwich cookies, chilled until firm, then decorated to look like a cemetery with cookie tombstones, gummy worms and candy pumpkins. Hands-on time is about 20 minutes, then it needs 2 to 4 hours in the fridge. You will also see it called a cemetery cake, Ghosts in the Graveyard or dirt pudding, and they all mean the same dessert.
I have made this every October for years, for school parties and for neighbors, and the reason it keeps coming back is that it hands well, scales to a crowd and asks almost nothing of the oven. The whole thing happens in one dish.
The part that trips people up is not the recipe. It is the chocolate, the crumbs and the timing, so here is the version that has not collapsed on me yet.
Table of Contents
- What You Need
- The pudding base
- The graveyard decorations, all optional but all edible
- Gear
- Swaps if you need them
- Step-by-Step
- 1. Prepare the cake pan
- 2. Mix the chocolate pudding base
- 3. Add the dirt and decorate the surface
- 4. Make edible tombstones and grave markers
- 5. Add spooky finishing details
- 6. Chill before serving
- Common Mistakes
- Frequently Asked Questions
- Can I make a graveyard dirt cake without pudding?
- What is the best topping for a graveyard dirt cake?
- How long should I chill a graveyard dirt cake before serving?
- How do I keep the tombstones from falling over?
- Can I make a graveyard dirt cake ahead of time?
- What decorations are safe and edible for a graveyard cake?
- Conclusion
What You Need
A 9×13-inch pan of graveyard dirt cake needs very little, and most of it comes from a grocery aisle you have already walked through.
The pudding base
- 1 small box (about 3.9 ounces) instant chocolate pudding mix
- 2 cups cold milk
- 1 tub (about 8 ounces) whipped topping, plus a few extra cups if you want a thick top layer
- 1 package chocolate sandwich cookies, roughly 22 cookies
Buy instant pudding, not cook-and-serve. Cook-and-serve needs heat and a stove, which defeats the whole no-bake point of the recipe.
The graveyard decorations, all optional but all edible
- 6 to 8 long sandwich cookies for tombstones
- White candy melting coating or vanilla-flavored candy melts
- Black edible marker or black gel food coloring for lettering
- A pack of gummy worms
- Candy pumpkins, candy bones or marshmallow Peeps ghosts
- Green-tinted graham cracker crumbs or crushed mint cookies for moss
Gear
A 9×13-inch clear glass baking dish is the best choice here, because you can see the layers through the side and the whole thing looks like a cross-section of a cemetery when it is cut. A food processor crushes cookies fastest, though a sealed bag and a rolling pin work just as well. You will also want an offset spatula for leveling layers and a piping bag or squeeze bottle for chocolate fence posts.
Swaps if you need them
| Instead of | Use | Note |
|---|---|---|
| Instant chocolate pudding | Any flavor of instant pudding, or a from-scratch cocoa and cornstarch pudding | Strawberry and vanilla make a brighter graveyard |
| Chocolate sandwich cookies | Chocolate chip cookies, graham crackers, shortbread | Sandwich cookies give the darkest, most convincing dirt |
| Whipped topping | Whipped cream sweetened with powdered sugar | Whipped cream is less stable, so chill a little longer |
| Regular milk | Oat milk or soy milk, warmed first | Works for dairy-free; check that the pudding has no gelatin |
| Gluten-free needs | Gluten-free sandwich cookies and a gluten-free pudding mix | Swap every cookie, including the tombstone cookies |
| Nut-free needs | Nutter Butter style cookies or graham crackers for the dirt | Check that candy decorations are made in a nut-free facility |
Two notes on dietary swaps. Whipped topping is usually dairy-free but read the label, because some brands are not, and pudding mixes sometimes contain gelatin, which matters for vegetarian guests.
Step-by-Step
Here is how to make a graveyard dirt cake in six stages, with the visual cue for each one so you know it worked.
1. Prepare the cake pan
Lightly grease a 9×13-inch dish and line the bottom with parchment if you want clean slices later. The base layer matters more than the recipe suggests, because everything else leans on it.
If you are starting from scratch, cool and crumble a baked chocolate cake into the dish first and press it down firmly with the bottom of a glass. A pudding-only version needs no base at all, which is the traditional form and honestly the one I prefer.
2. Mix the chocolate pudding base
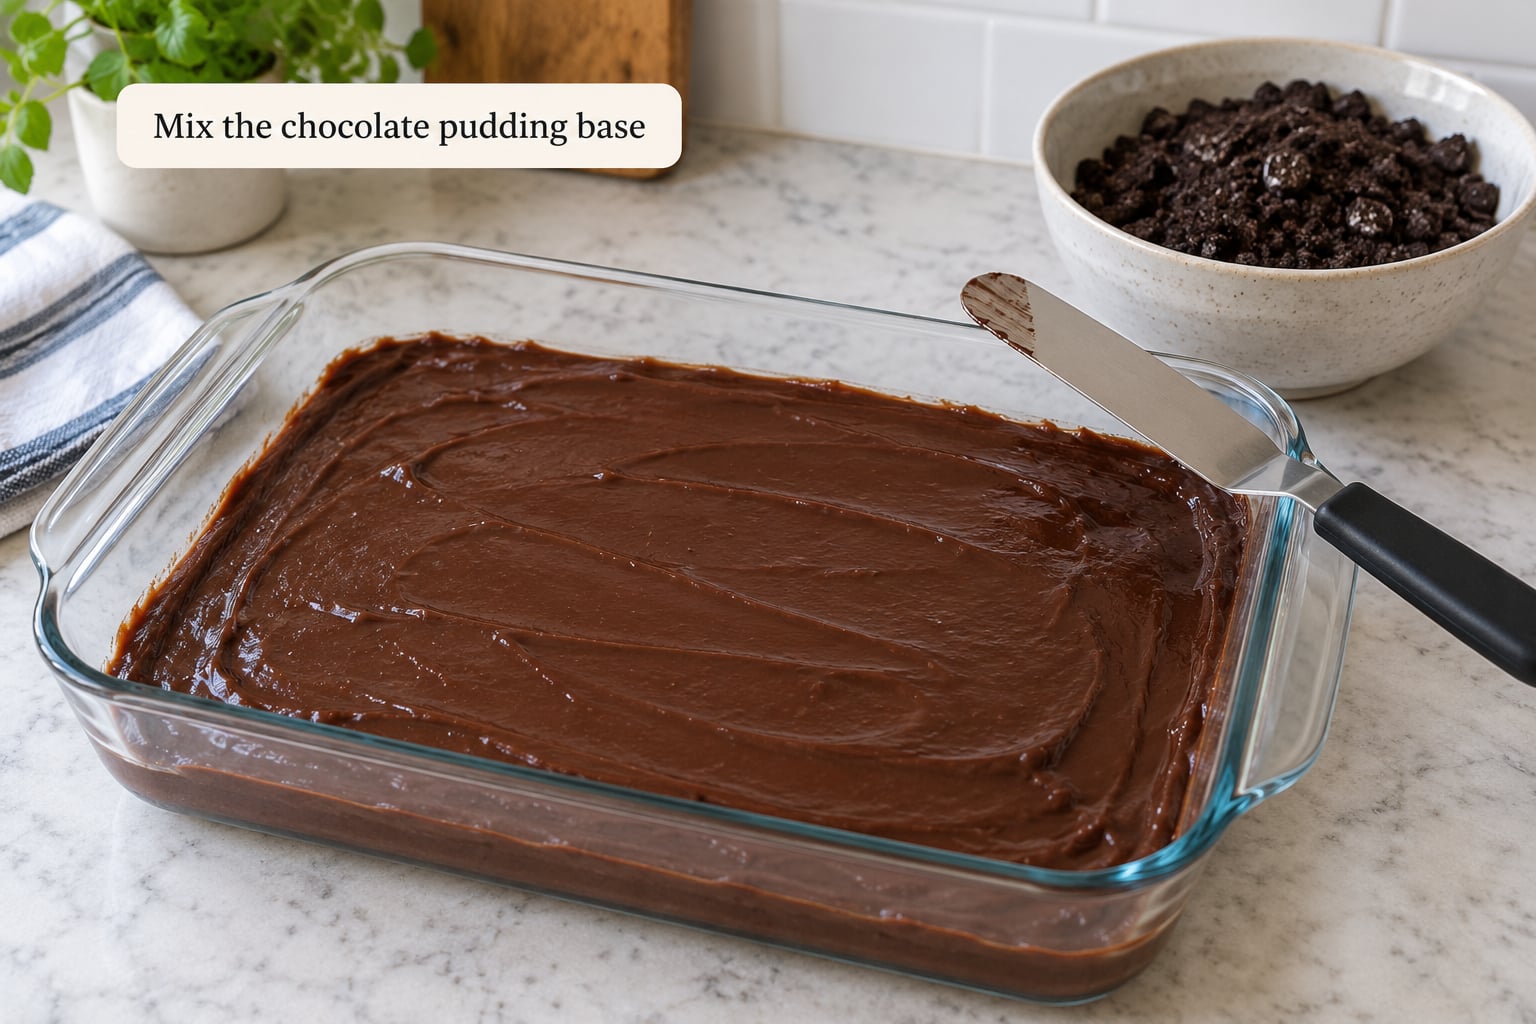
Whisk the pudding powder into the cold milk and keep whisking for a full 2 minutes. It will look thin and grainy for about five minutes while the pudding sets, then suddenly thicken into a pudding. That sudden moment is normal, so do not add more milk.
Fold in roughly 2 cups of whipped topping with a spatula until you have a thick, glossy, spreadable mixture that holds the shape of the spoon. Too loose and the crumbs sink into it; too stiff and you tear the surface spreading it. Somewhere between soft peaks and a thick mousse is right.
Scrape half of it into the pan and smooth it flat with your offset spatula. An uneven base shows up as a cake that rocks when you cut it.
3. Add the dirt and decorate the surface
Crush the 22 cookies into fine crumbs in a food processor, or in a freezer bag under a rolling pin. Fine is the goal. Coarse chunks read as rocks, and the fine ones pack down into something that looks like actual soil rather than gravel.
Scatter the crumbs over the pudding in a light, uneven layer. Do not stir them in. The single most common mistake in this recipe is mixing the dirt into the pudding, which turns the whole pan into a uniform brown sludge with no visible layers.
Sweep a path through the crumbs with the back of a spoon and push a small mound of green-tinted crumbs along one side of it. The contrast between the dark dirt, the pale path and the green moss is what makes the scene read as a graveyard at a glance.
4. Make edible tombstones and grave markers
Melt the white coating in 20-second microwave bursts, stirring between each one. It is ready when there are no solid pieces at the bottom and the melted coating looks like thick paint.
Dip the flat face of each cookie into the coating and lift it out, letting the excess drip off for a few seconds. While the coating is still wet, write RIP or a short epitaph on it with the edible marker. Trying to letter dried coating is how you end up with smudged, unreadable gravestones.
Press each tombstone into the crumb surface at a slight angle, sinking it about half an inch. The crumbs are the anchor, and leaning tombstones honestly look better than a row of perfect ones. Set them in clusters of two or three with gaps between, rather than evenly spaced.
For fence posts and bare trees, pipe lines of melted chocolate or melted dark candy coating onto a parchment-lined sheet, let them set for 20 minutes, then push them into the dirt along the edge.
5. Add spooky finishing details
Gummy worms are the detail that gets the reaction, so use them well. Press them into the soil at an angle so part of each worm sits above the surface. If you are decorating more than 2 hours ahead, add the worms just before serving instead, because sugar on a wet surface slowly bleeds color into the crumbs.
Scatter candy pumpkins across the surface rather than in rows, and tuck a few white candy bones at the base of the tombstones. If you want a ghost, a marshmallow Peep dropped straight into the pudding stands up on its own with no support.
Leave some open dirt. A graveyard cake crowded with candy looks like a candy bowl, and the empty patches are what suggest ground that was disturbed a long time ago.
One safety note if small children are at the party. Skip decorative toothpicks entirely, or keep every child over four away from anyone holding one, since candy-topped toothpicks are a genuine choking and puncture risk.
6. Chill before serving
Refrigerate for at least 2 hours, and 4 hours is better. The pudding firms up in that window, the crumb layer stops drifting and the whole pan slices cleanly. Overnight chilling gives you the most stable base but softens the crumbs, so aim for 4 hours if you can.
Cut with a long thin knife wiped clean between cuts. Lift each slice with a flat spatula rather than tipping the pan, and serve straight from cold.
To transport it, set the chilled dish in a cooler with an ice pack. Do not put a plastic lid directly on the surface, because condensation will run down and puddle into the dirt.
Common Mistakes
Nearly every disappointing graveyard dirt cake I have eaten had one of these problems.
- The pudding base is too runny and the crumbs sink. You likely folded in too little whipped topping, or you skipped the full 2 minutes of whisking. Test it by turning a spoon upside down: the mixture should hold a soft peak and slowly slump.
- You stirred the dirt into the pudding. There is no fix after the fact, but for next time, layer instead of mix. Add a thin second layer of pudding over the crumbs so the soil is sandwiched rather than dissolved.
- Gummy worms bled pink streaks into the soil. Their sugar coating was in contact with a wet surface for too long. Add them at serve time, or blot them dry and press them cut-side down.
- Tombstones tipped over. Press them deeper, at a deliberate angle so they lean on each other, or add a small dab of melted chocolate at the base as glue. A few leaning stones are fine. Stones lying flat are not.
- Lettering on the tombstones is sharp and unreadable. You wrote on a cookie after the coating set. Lettering only takes on a coating while it is still wet and glossy.
- The finished cake looks watery or has a thin puddle at the bottom. That is condensation from a temperature swing, usually a fridge-to-table transfer in humid weather. Wipe the pan dry before slicing and keep it chilled until serving.
- Everything tastes flatly chocolate. The dirt contributes most of the cocoa flavor. Add contrast with the white tombstones, strawberry or vanilla pudding, or a scattering of white candy melts.
Frequently Asked Questions
Can I make a graveyard dirt cake without pudding?
You can, but the texture changes. The traditional recipe uses instant chocolate pudding as both the flavor and the structure, and it is what sets firm in the fridge. A version built from whipped topping and cocoa powder alone tends to stay soft, so give it an extra hour of chilling and keep the layers thin. A baked chocolate cake base with frosting works as a substitute if you want something sturdier.
What is the best topping for a graveyard dirt cake?
Gummy worms are the classic choice and they are the only decoration I would call essential, because they are what makes the scene look disturbed rather than arranged. Candy pumpkins, white candy bones and marshmallow ghosts add height and contrast. Green-tinted graham cracker crumbs for moss and piped chocolate fence posts make it look designed rather than dumped together.
How long should I chill a graveyard dirt cake before serving?
At least 2 hours, and 4 hours gives you the cleanest slices and the firmest crumb layer. Overnight is fine for the pudding but softens the cookies, so the crumbs go a little dusty. If you are short on time, freeze it for 30 minutes after the 2-hour chill, then move it to the fridge for 20 minutes before serving.
How do I keep the tombstones from falling over?
Push each one about half an inch into the crumb layer and tilt it slightly so it rests against its neighbor. If your crumbs are coarse and give no grip, add a dab of melted chocolate at the base as glue and hold it in place for a minute. Keep the cookies fairly light and wide, since tall narrow markers topple far more easily.
Can I make a graveyard dirt cake ahead of time?
Yes, and it is one of the main reasons to make this dessert. Assemble the pudding and crumb layers up to 24 hours ahead and refrigerate. Wait on the cookies until the day of, so the coating stays crisp and the lettering stays readable. Add gummy worms and other sugary candy in the last hour before serving, since they bleed color into the soil if they sit overnight.
What decorations are safe and edible for a graveyard cake?
Use candy coating, cookies, gummy candy, marshmallows and edible markers, all of which are edible as they sit on the surface. The one thing to leave out is decorative toothpicks and plastic picks, particularly around children under four, since they are a real choking and puncture hazard. If you want upright ghosts, push marshmallow Peeps directly into the pudding instead.
Conclusion
Start with the cookies. Crush them fine, mix the pudding until it holds a soft peak, and give the pan a full 4 hours in the fridge. Those three things decide whether the cake holds together.
Everything after that is the fun part, and it is where a graveyard dirt cake stops being a recipe and becomes whatever your group finds funny. Write real names on the tombstones, let the kids place the worms themselves, add a chocolate fence around the edge. It costs about twenty minutes and it is the dessert people remember from the party.