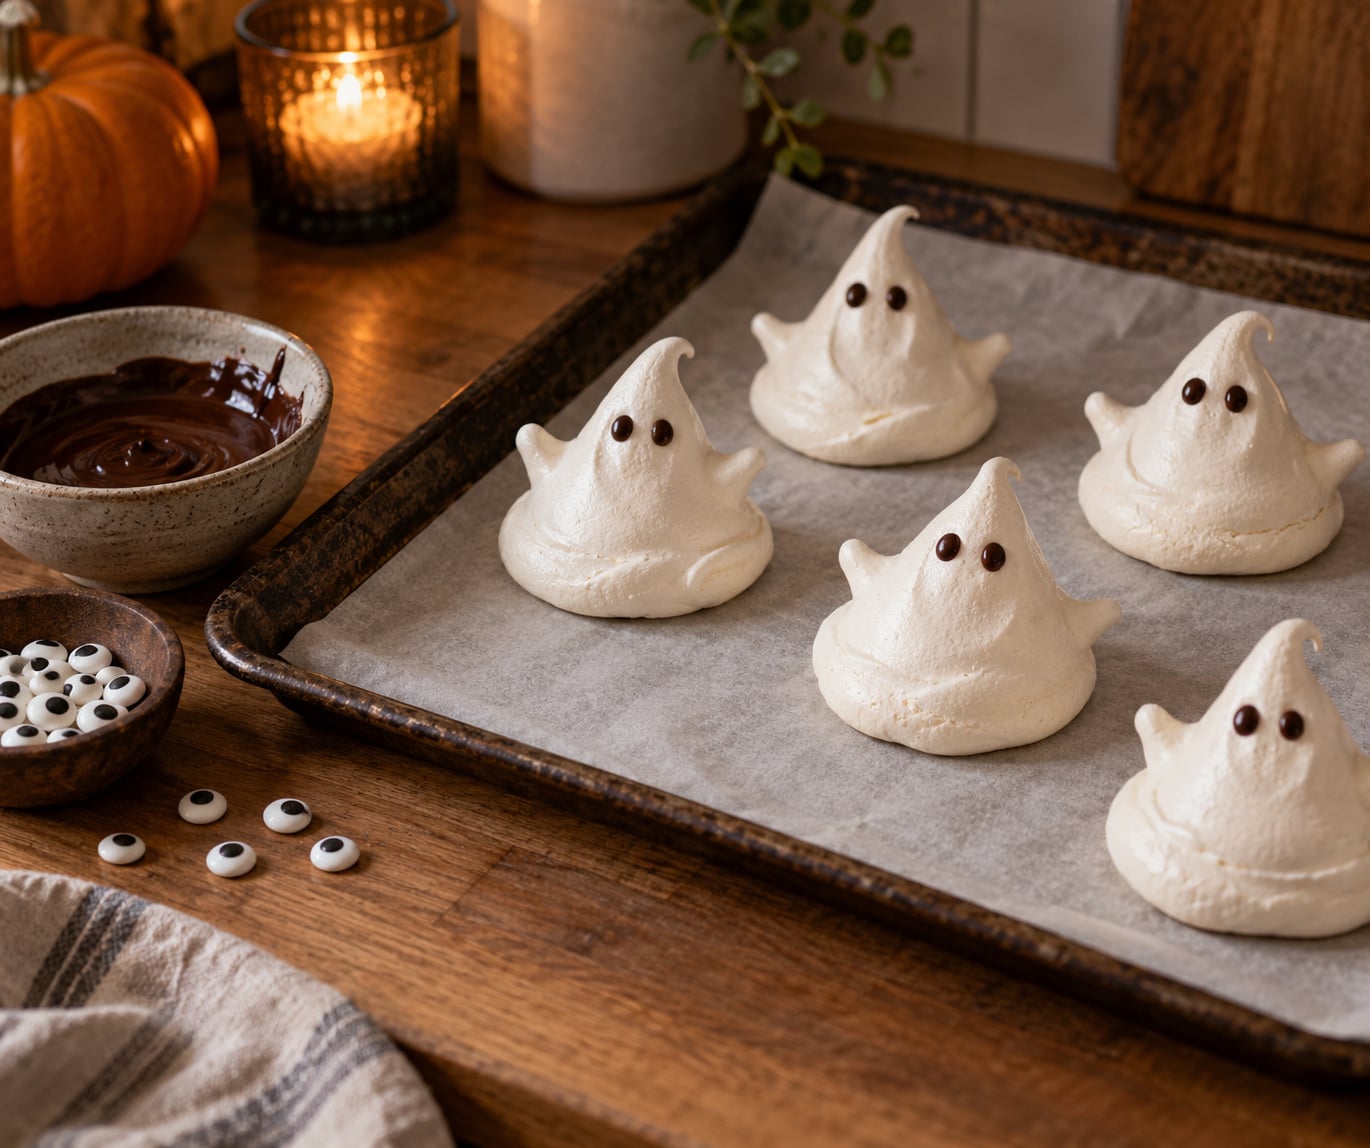
Meringue ghost cookies are piped rounds of whipped egg white and sugar, baked low and slow until crisp, then finished with two candy eyes and a crooked mouth. To make meringue ghost cookies properly, whip the whites to stiff glossy peaks, pipe them with a large star tip, and bake at 200°F for about an hour and a half so the inside dries out without browning.
Active work is around 15 minutes. The oven does the rest, slowly, and that patience is exactly what separates a snap-crisp ghost from a chewy one.
Meringue ghost cookies are a pure meringue cookie rather than a shortbread or oat-based dough, so there is no chilling, no rolling and no dough to rest. If you have a stand mixer, a piping bag and a large star tip, you are ready.
Table of Contents
- What You Need to Make Meringue Ghost Cookies
- Ingredients
- Equipment
- Optional decorating supplies
- Substitutions, not requirements
- Step-by-Step: Six Stages That Decide the Texture
- 1. Heat the Oven and Prep the Piping Bag
- 2. Make the Meringue
- 3. Pipe the Ghost Shapes
- 4. Bake Until Dry
- 5. Cool and Decorate the Meringue Ghost Cookies
- 6. Store or Serve
- Common Mistakes and How to Fix Them
- Frequently Asked Questions
- Do meringue ghost cookies need a cookie base?
- Why are my meringue ghosts flat or spreading?
- How long should meringue ghost cookies bake at home?
- Can I make meringue ghost cookies ahead of time?
- Why did my meringue cookies become sticky after baking?
- Conclusion
What You Need to Make Meringue Ghost Cookies
Ingredients
This makes roughly 24 to 30 ghosts across two baking sheets.
- 4 large egg whites, about 120 g, at room temperature
- 1 cup (200 g) caster sugar, ideally superfine
- 1/2 teaspoon cream of tartar
- 1/2 teaspoon vanilla extract (optional, for a warmer scent)
- Pinch of salt
That is a three-ingredient meringue plus optional extras, which is why egg whites left over from Halloween cobweb cheesecake or lemon meringue pie are genuinely useful.
Equipment
- Stand mixer with a whisk attachment, or a hand mixer
- Large star piping tip, roughly 1-inch opening, plus disposable piping bags
- Two rimmed baking sheets lined with parchment or silicone mat
- Heatproof bowl and whisk that are completely grease-free
A 1M tip gives thin, spidery ghosts. A large open star gives the plump, friendly shape most people picture.
Optional decorating supplies
- Candy eyes, mini or regular
- Dark chocolate or semisweet chips, melted
- Black gel icing or an edible marker
Substitutions, not requirements
French meringue is the one you want here: raw sugar straight into whipped whites. Italian meringue cooks the sugar into a hot syrup first and is far more stable and forgiving, Swiss sits in between by heating the whites themselves. Neither is better, but Italian survives a delay before baking, which helps if you are decorating other things at the same time. For straight ghost shapes, stick with French.
Cream of tartar can be swapped for a teaspoon of lemon juice or a splash of white vinegar. If your sugar is not superfine, run it through a food processor for 30 seconds or push it through a fine mesh strainer; coarse crystals do not dissolve and the ghosts weep syrup.
Step-by-Step: Six Stages That Decide the Texture
1. Heat the Oven and Prep the Piping Bag
Set the oven to 200°F (95°C), or 175°F (80°C) with the fan on, and put the rack in the middle. Line two baking sheets with parchment.
Fit the star tip into a piping bag and squeeze a small dab onto a scrap of parchment. The dab should hold a sharp point where you stopped piping. If it slumps flat, the tip is too wide for this mixture.
Stand the piping bag in a tall glass while you fill it. Squeezing a bag full of sticky meringue with one hand while holding the bowl with the other is the least controlled part of the whole recipe, and a glass keeps the tip out of the mixture.
Fill the bag no more than halfway, twist the top closed, and rest it on a damp towel so it does not roll off the counter while you mix.
2. Make the Meringue
Set the egg whites out for 20 to 30 minutes. Cold whites barely reach volume, and room temperature whites whip to roughly twice the height.
Beat on medium-high until the whites are foamy and hold a soft peak when the whisk is lifted, about 2 minutes. Add the cream of tartar and the salt, then keep beating for another 2 to 3 minutes until stiff peaks stand straight up.
Eggs that have been in the fridge a week are the best whites you will ever get. Older whites have less water in them, so they whip faster and hold longer. If you are using fresh eggs, separate the whites a day ahead and refrigerate them uncovered so they lose a little moisture.
Beating by hand is fine, it just takes longer: expect 8 to 10 minutes to reach stiff peaks against 3 to 4 in a mixer. A food processor whips in about a minute, though a small bowl means a small batch.
Now rain the sugar in gradually, a spoonful at a time, whisking on low after each addition. A properly finished French meringue is bright white, glossy, and thick enough to hold ridges that barely move when you tilt the bowl.
Stop whipping once the sugar is in and the mixture looks satiny. Overbeaten meringue goes dull and grainy, and it pipes badly.
3. Pipe the Ghost Shapes
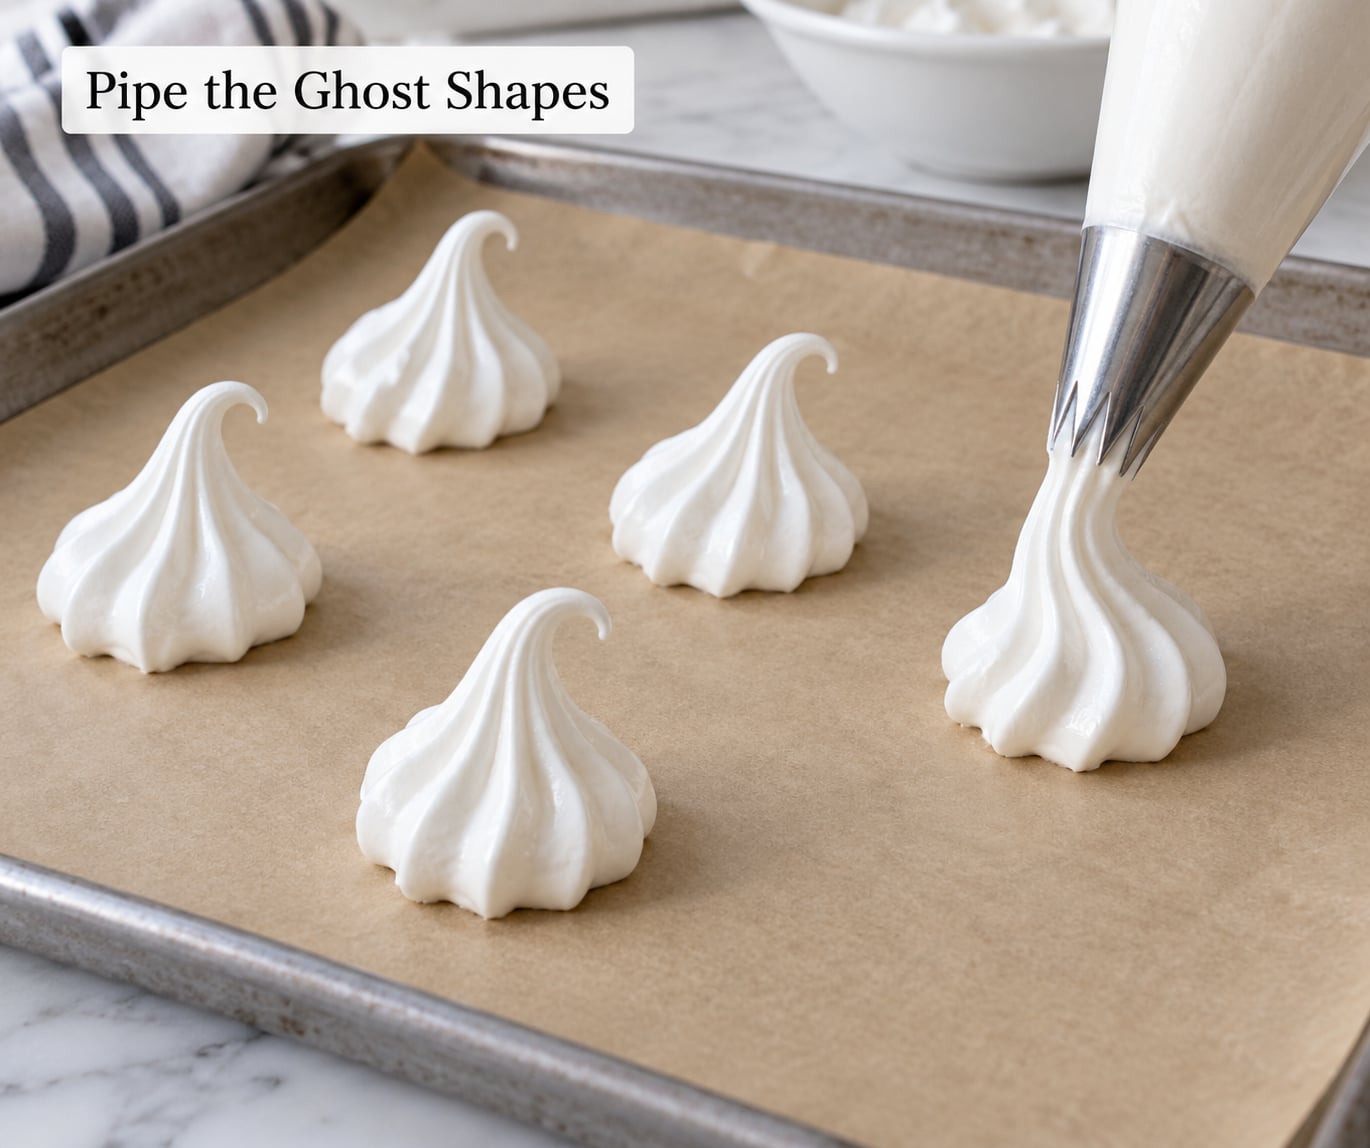
Hold the bag straight up, about half an inch above the parchment, and squeeze a 1 to 1.5-inch round. Lift away to make a small point, then pull the tip up and slightly sideways in one quick motion to create a tail.
Leave 1.5 inches between ghosts. They spread a little in the oven and touching ghosts merge into one lumpy shape.
Three shapes work well. The round-and-tail is the fastest. The three-dollop method builds a wider ghost by piping a bottom round, a middle one on top, and a small head. A large round piped with three little arms pressed in with the back of a spoon looks the most like a classic sheet-mold ghost.
If the bag will not squeeze, the mixture is too stiff: add a teaspoon of warm water and fold gently. If the ghosts puddle instead of holding ridges, the mixture is too loose, so whip it another minute or dust the bag’s interior with a little superfine sugar.
4. Bake Until Dry
Bake at 200°F (95°C) for 1 hour 30 minutes to 2 hours, rotating the trays halfway through if your oven runs hot on one side. Turn the oven down to 175°F for the last 20 minutes if the edges start to color.
They are done when the shells feel dry and hollow when you tap the underside and lift one off the sheet with a finger. The outside should be crisp, the center soft and marshmallow-like.
Do not cut the bake short. Meringue finished on the outside but damp in the middle collapses into sticky blobs within an hour.
Also watch the color. Golden-brown meringue tastes of burnt sugar, and a few toasted edges on a few ghosts is charming; fully browned ghosts are not.
Altitude changes the timing. Above roughly 5,000 feet, water boils below 212°F, so meringue dries more slowly and the sugar can seize into a shell before the inside sets. Add 20 to 30 minutes to the bake, check an oven thermometer while you are at it, and never raise the temperature to compensate, because the outside browns before the middle dries.
Humidity is the other enemy. Meringue pulls moisture out of the air as it bakes, so a foggy October afternoon or a kitchen next to the dishwasher can slow drying. If your ghosts stay tacky, add 15 minutes.
5. Cool and Decorate the Meringue Ghost Cookies
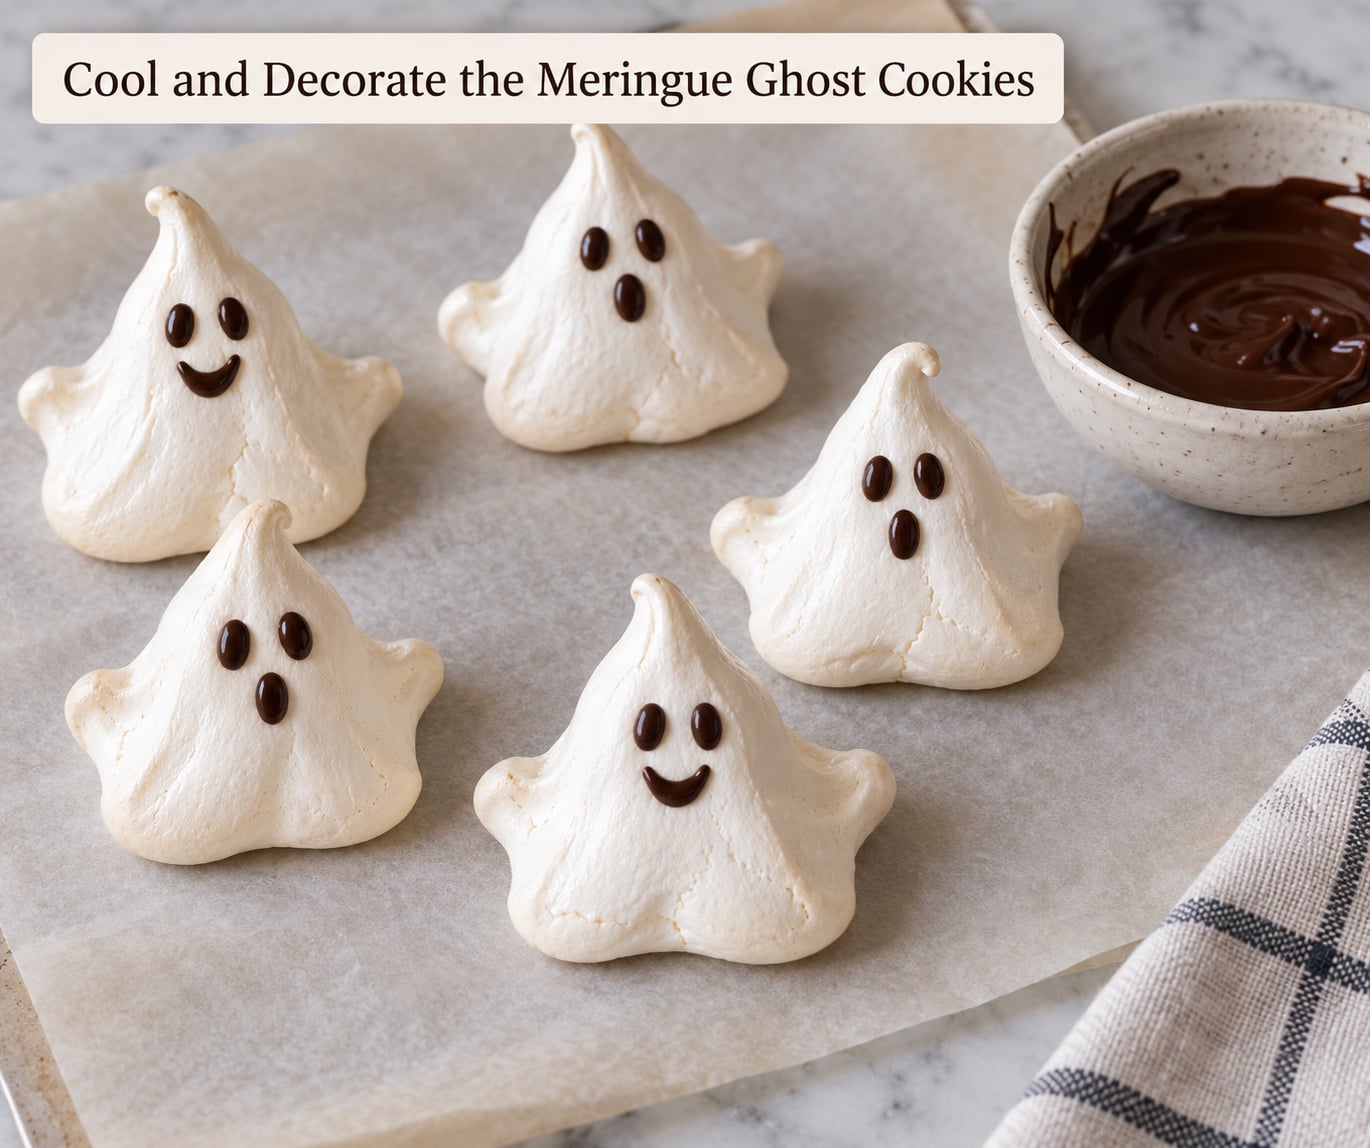
Leave the ghosts on the baking sheet in the switched-off oven with the door cracked for 30 to 60 minutes. Trapping the escaping moisture inside the oven while the residual heat finishes the drying gives you the driest shells.
Then cool them on the parchment for 15 minutes. Do not slide a hot ghost onto a rack. The inside is still soft, and warm meringue snaps when it flexes.
For eyes, press candy eyes into each ghost while it is still slightly soft. For chocolate, melt 2 tablespoons of dark or semisweet chips with a teaspoon of coconut oil or shortening, let it cool to room temperature so it does not melt the shell, then dab with a toothpick or a squeeze bottle. Two eyes and one small O mouth takes about 10 seconds per ghost.
Gel icing and an edible marker are the fastest option and the best choice with kids, since there is no heat and nothing to wash.
With kids, set out a small tray of candy eyes, one bowl of melted chocolate and a jar of sprinkles, and let the decorating be the messy part of the recipe. Little ghosts with mismatched eye sizes look better than tidy ones, and a black marker is safe for hands that want to draw before the chocolate sets.
Do not refrigerate decorated ghosts. Condensation is the number one reason chocolate eyes smear and icing lifts off.
6. Store or Serve
Undecorated ghosts keep in a single layer in an airtight container at cool room temperature for 7 to 10 days. Parchment between layers stops them sticking if you stack them, and a slice of bread in the container absorbs any stray moisture.
Do not refrigerate them. Every time you bring a container in from a warm kitchen, condensation lands on the shells and softens them.
Decorated ghosts are best within a few days, since the candy eyes and chocolate can dull or pick up odors. Keep them out of direct light and away from anything scented, because meringue absorbs smells quickly.
For a Halloween party, bake one to three days ahead, store airtight, and decorate the morning of the party.
For a party of 30, double the recipe rather than tripling it. A stand mixer bowl that is more than two-thirds full will not aerate properly, and the second batch whips just as well in the time you saved.
The make-ahead timeline, if you are planning a party, runs like this. One week ahead still sits inside the shelf life, three days ahead leaves room for decorating without rush, and the day of gives you the freshest shells. Freezing is possible but rarely worth it; ghosts that thaw are soft, and they re-crisp best in a 250°F oven for 10 minutes.
Common Mistakes and How to Fix Them
Flat ghosts that spread into puddles. The mixture was piped too soft. Add superfine sugar to the bowl or whip longer, and hold the bag higher so each shape falls less. A bag with a big hole in it leaks pressure and produces the same flat result, so squeeze a dab first to check it.
Weeping syrup around the base. Sugar did not dissolve, so the syrup leaked out during the bake. Use superfine sugar, add it slowly, and whip until the mixture looks glossy and no grainy streaks remain.
Sticky cookies the next day. Almost always underbaking or humidity, not the recipe. Give them another 15 to 20 minutes at 200°F the next day, and store them airtight with a piece of bread to absorb moisture. Never fridge them.
A grainy, weepy mixture. Either the sugar went in too fast or the whites were beaten past stiff peaks. Scrape down and start over; overbeaten meringue cannot be rescued with more sugar.
Ghosts that will not hold a shape. Check three things in order: grease on the bowl, a yolk that slipped into the whites, and cold eggs. Wipe the bowl with a little vinegar on kitchen paper, start with fresh whites, and let them warm up. A single speck of yolk will stop the whole batch from stiffening.
Broken cookies when you lift them. They came out of the oven hot or you forced a spatula under too early. Cool fully on the sheet, then slide a thin spatula under with a gentle rocking motion.
Browned or cracked shells. Too much heat or too long a bake, sometimes both. Move the rack down, drop to 175°F, and pull them earlier. Cracks along the top usually mean the oven door was opened mid-bake or a cold tray shocked the drying shells.
Decorations that smear or slide. The chocolate was too warm, or the ghost was warm. Set the melted chocolate to room temperature first and decorate only fully cooled ghosts. Edible marker works best on ghosts baked the same day, when the shell has not hardened with age.
Beads of moisture inside the container. Warm ghosts went in too soon. Cool them completely, then store, and skip the fridge.
Ghosts that shrank. They were underbaked, and the wet interior collapsed as it cooled. Next time, tap the shell before pulling: if it flexes at all, give it another 20 minutes.
A batch that will not save. Grainy, weepy meringue is past fixing for baking, but it makes a fine topping. Spoon it over a tart, a lemon pie or a cup of hot coffee and call it a bonus.
Frequently Asked Questions
Do meringue ghost cookies need a cookie base?
No. Meringue ghost cookies are made entirely from whipped egg whites, sugar and an acid stabilizer, piped straight onto parchment and baked until dry. They are not baked on shortbread, oat or graham cracker dough. The shape holds because the whipped whites set into a foam structure, then the sugar dries into a brittle shell during the long low bake.
Why are my meringue ghosts flat or spreading?
Almost always a consistency issue. If the peaks were only soft when you piped, the ghosts slump. Check for three things: grease on the bowl, a yolk in the whites, and cold eggs, since each one stops the meringue stiffening. Whip to stiff glossy peaks, hold the bag about half an inch above the parchment, and squeeze a test dab first to make sure the tip is not leaking.
How long should meringue ghost cookies bake at home?
Bake at 200°F (95°C) for 1 hour 30 minutes to 2 hours, rotating the trays halfway through. They are done when the shell is crisp and dry and the underside lifts off the parchment without bending. Pulling them too early is the most common reason meringue ghosts turn sticky overnight. If your kitchen is humid, add another 15 minutes rather than raising the temperature.
Can I make meringue ghost cookies ahead of time?
Yes, and this is one of the best make-ahead Halloween treats. Bake them one to three days ahead, cool completely, and store single-layer in an airtight container at cool room temperature for up to 7 to 10 days. Decorate the morning of the party so the chocolate and gel icing stay sharp. Avoid the refrigerator, because condensation softens the shells.
Why did my meringue cookies become sticky after baking?
Sticky shells mean residual moisture inside. Either the bake was too short or the air was humid enough that the meringue could not dry fully. Return them to a 200°F oven for another 15 to 20 minutes, then cool in the switched-off oven with the door cracked. Once stored, keep them airtight, skip the fridge, and add a slice of bread to soak up any stray moisture.
Conclusion
Start with room temperature egg whites and a grease-free bowl, whip to stiff glossy peaks, and pipe small ghosts with plenty of space between them. Bake low and slow at 200°F for at least an hour and a half, and cool them in the turned-off oven with the door cracked.
Decorate with candy eyes pressed in before they fully set, and store the rest airtight at room temperature rather than in the fridge. Once you nail how to make meringue ghost cookies, the same foam turns into lemon pies, cupcakes and macarons all autumn.